

In this article, I’ll be showing you how to get started using Davinci Resolve 17. Additionally, I’ll show you one of my organization methods that helps improve the workflow of later videos. Of course, you are free to create an organizational structure that suits your preferences best, but I wanted to share mine in case you weren’t sure what would work.
I’ll also be briefly addressing finding video topics to create content about. This is one of the most challenging things about being a creator, and there are little tricks that you can do to make this easier on you. I’ll be covering this subject in more detail in a later article, as it deserves its own.
Table of Contents
1: DaVinci Resolve 17’s System Requirements
DaVinci Resolve 17 is fairly demanding on the computer’s hardware for editing performance, so I’ll also be briefly addressing those recommendations here as well, albeit briefly. These are the only hard requirements.
- 16+ gigs of ram (32 is the ideal minimum)
- At least a GTX 1050 ti (RTX 2060 or better is ideal) – Ensure that you have the latest drivers
- AMD Drivers
- NVIDIA Drivers
- Intel Drivers (For Discrete GPUs (Coming Soon))
- An I7 (Haswell or newer) or Ryzen 5 CPU
The software performs well with 16 gigs of ram, but you can get away with 8. However, If you only have 8 gigs of ram, I recommend sticking to 1080p 60 fps content or lower resolution. The reason for this is that as your footage starts to become higher resolution, it takes up more space in the ram. If you exceed the amount of ram in your system, it will fall back into your HDD or SSD, which is substantially slower than the capabilities of RAM, and your editing experience on the timeline will degrade substantially.
As for the GPU and CPU needs, they also affect timeline performance, but the biggest impact they have is on render time. The faster your GPU and CPU, the less time it takes to fully render out the final video project.
DaVinci Resolve performs a scan of your computer upon installation that will determine if your components are up to the task of editing, in case you don’t know what components are in your system.
You can skip to Section 5 if you want to jump right into the DaVinci Resolve Setup steps.
2: Pre-Work: Create your Video Folder Structure
Before you begin your editing journey, I recommend that you set up a solid and organized folder structure. Being organized from the start is very important, as it can save you a ton of time later, and makes it easier to find older material to reference later. This structure is what I personally use, and it has served me well.
- Video-Projects
- B-roll
- Year
- {Project Name} Replace this with your project names
- Year
- Sounds
- Music
- Personal Preference Organization. Genre, Emotion, etc.
- SFX
- Music
- Year
- {Project Name} Replace this with your project names
- Raw-Footage
- Final-Render
- Thumbnails
- B-Roll (As a Shortcut to the separately stored folder within the Video Projects)
- Sounds (As a Shortcut to the separately stored folder within the Video Projects)
- Script (Optional)
- {Project Name} Replace this with your project names
- B-roll
Regarding the Shortcuts within the project folders, I suggest setting this up in this way, because you will often find yourself reusing these assets across a number of your video projects. Rather than duplicate these reused assets, setting it up as a shortcut will save you a lot of room on your hard drive as you grow your video archive.
In case you don’t know how to create a folder shortcut, here is a quick guide on how to accomplish this. (It’s super easy)
2a: How to Create A Folder Shortcut
If you’re using Windows 10, simply:
- Right-click the folder you want to create a shortcut to
- Select “Create Shortcut”.
Windows 11 users have an extra step for some dumb reason though:
- Right click on a folder
- Select Show more options
- Click on Create Shortcut
Mac Users Make an Alias, rather than a Shortcut (It’s the same thing though.)
- Select the folder you want to make an alias of by clicking on it once
- From the File menu, select “Make alias”
- Drag the Alias folder into your project folder
Linux Users:
- Use a command, ensuring you remove unnecessary text from the command
- Be sure you don’t use spaces in any folder names
ln -s ~/Video-Projects/B-roll ~/Video-Projects/year(Replace this)/{Project Name} (Replace curly braces with your project name)

ln -s ~/Video-Projects/Sounds ~/Video-Projects/year(Replace this)/{Project Name}
EX. ----------
ln -s ~/Video-Projects/B-roll ~/Video-Projects/2022/how-to-make-a-video-in-davinci-resolve
3: Find a Topic
The third, and most important part of making a video in DaVinci Resolve 17 is to have a video topic in mind before you start recording. I’ve tried making videos in the past where I didn’t have a specific goal in mind, and I quickly lost direction, and subsequently, motivation to continue making that video from the confusion such an approach caused.
Stating, “I want to make videos” isn’t enough. Instead, I want you to consider something specific. For example, “I want to make a video about how to play a song on the piano.” This idea tells you a lot about how you can go about structuring the video in a way to present to an audience. You will be featuring a song, and you will need some way to display the key order to an individual learning the song.
It doesn’t have to be about a song, that was just an example. However, it needs to be specific enough for you to intuitively structure the media into a cohesive start-to-finish video. Trust me when I say this – the more specific your video is, the easier it is to make.
3a: Writing a Script
Writing scripts is optional, but can be extremely helpful for getting the video structured. A script will contain the meat of the video and is typically used exclusively by you. It is also helpful when you make mistakes in the recording process – biting your tongue, accidentally spitting or drooling, or someone barges into your room during a recording, ruining a take.
With that said, I have seen some YouTubers utilize their video scripts within their videos as B-roll assets, to point out blunders, or funny mistakes within it to add comedic effect.
3b: Script Tools – Teleprompters, Software, etc.
A teleprompter or tablet with a scrolling text feature can be used to display your script directly in front of your recording camera so that your eyes face the camera. This tool is used by many media production studios for movie production, news broadcasting, and even presidential addresses to the public. It is also commonly used by YouTubers who utilize a script for their video content.
As for Software – I use Google Docs myself, and my own website.
3c: How Long Should a Script for a Video Be?
It honestly depends on the type of video you are making. A verbose theory you have could run you anywhere from 1800 words to over 3500 words. The resulting recorded content would be somewhere in the ballpark of 16-25 minutes, depending on how fast you talk.
A neat trick, if you are finding that your video is getting a tad too long, and nothing can be cut – boost the playback rate a bit. Additionally, if it is too short, the opposite is true, simply slow down playback slightly. I’ll show you how to do this in DaVinci Resolve 17 in a later article.
4: Record Footage
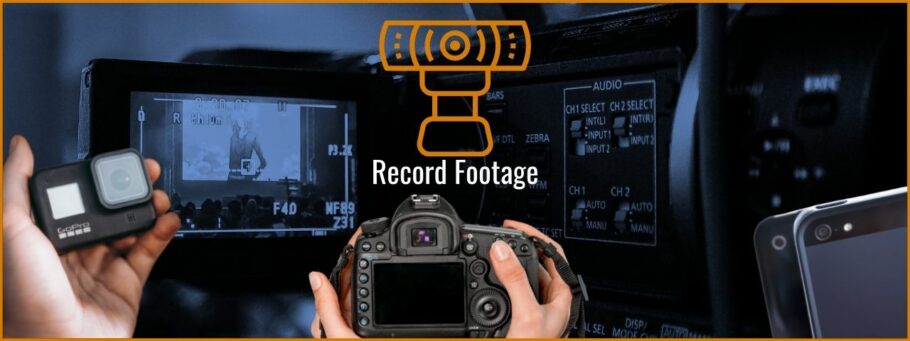
The next step, once you’ve found a video topic is to just start recording. Of course, you’ll need the tools to be able to record. Luckily, there is a popular device located within our pockets that can do just that, and it does it very well – your smartphones. This means that there is no need to buy an expensive purpose-built camera to get started making video content.
With that said, I do recommend looking into getting a small tripod with a phone clip to make recording easier, ideally, one with a ring light built-in. Propping the phone up against a pillow or picture on a desk works, but getting the right angle can be tricky, and no dedicated lighting reduces video quality a fair amount.
Alternatively, you can utilize a Webcam, Go-Pro, or really any other camera/camcorder you might have laying around in your house. Some of these devices will have a 1/4″ threaded tap to mount them to tripods like the one I use (No longer in stock, here is a similar one, and a mini size tripod for those working with tight spaces).
Finally, if you want to record your computer screen, there is a ton of software available for free to do just that, with OBS Studio being my go-to. I’ve covered it pretty extensively on this website too, so if you needed a guide on some of its features, you aren’t far from one!
At this stage in the video development process, you’ll likely be recording more than you will need – especially if you need to redo a part that you messed up your line. Don’t discard recording mistakes though, as they make excellent blooper b-roll content that can add a lot of humor to a video that appears bland.
4a: Recording Format – MKV, MP4, & Many More
DaVinci Resolve 17 has a staggering number of supported video formats, including:
- AVI
- MP4
- MOV
- MKV (as of Version 17.2 Released May 12, 2021)
- among many others
The type that OBS Studio records in by default is MKV. This is the format that I recommend that you import into DaVinci Resolve, as it will reduce the number of steps to get your content into the editor. It also supports most of the major formats used by phones, DSLRs, and Mirrorless cameras, so you won’t likely need to deal with converting files – simply place them within the project folder, and begin working.
4b: The Best Way to Transfer Recordings From a Smartphone
If your phone has a micro-SD card slot, using that as your recording drive will make the process of transferring your videos to your computer for editing much faster. The USB data transfer speeds simply can’t compare, and since the size of video content is not to be understated, especially if you record in 4k, anything that speeds the process up is welcome.
There is a good possibility of you already having some form of SD card reader built into a laptop, but if not, they tend to be very cheap. I have one of these, and it handles the reading of my v60 SD card with ease. Unfortunately, they don’t sell that specific model anymore, but they have many different options available, such as this USB hub.
4c: SD Card Speeds Explained
| Speed Rating | Minimum Transfer Speeds | Suitable For | My Recommendation |
|---|---|---|---|
| V90 | 90 MB/s | 8k, 4k, 1080p, 720p | Adata Premier 64GB 275 MB/s |
| V60 | 60 MB/s | 8k, 4k, 1080p, 720p | Prograde Digital 128 GB 250 MB/s |
| V30 | 30 MB/s | 8k, 4k 1080p, 720p | Sandisk 400GB Extreme 160 MB/s |
| V10 | 10 MB/s | 4k, 1080p, 720p | Lexar 32GB 100 MB/s |
| V6 | 6 MB/s | 4k, 1080p, 720p | Unable to find one that was in stock |
If you do plan to record in 4k, you’ll want a micro-SD card with at least a V6 class, but a V90 will be significantly faster at transferring files. The V symbol means that it is designed specifically with video in mind, with V6 meaning that it transfers at a rate of 6 MB/S, while V90 means Video at 90 MB/s. However, the sky is the limit, and some SD Cards can transfer as high as 300 MB/s, which drastically reduces the time spent moving video content to your editing PC. Of course, this much speed requires that you have an SD card reader on the USB 3.2 specification to not bottleneck the transfer.
Really though, any one of these V classifications is plenty to get your foot in the door, and you could make do with the slow transfers of USB if you are tight on money.
With all of that said, don’t get hung up on this point, as this is something that tends to come much later in the process. This isn’t a required component, I simply felt it was important to mention, because some of you may have one of these SD cards lying around that you can use to make the transferring process go much faster, saving you a lot of time in the long run.
5: Initial Setup of DaVinci Resolve 17
Now that you have your footage, you can finally open up Davinci Resolve 17 and piece together your video. If you don’t already have DaVinci Resolve, you can get it from their website for free.
Skip to Next Section if You already Have DaVinci Resolve installed.
5a: Installation Process for DaVinci Resolve
If you are installing it for the first time, you’ll need to go through the initial setup process.
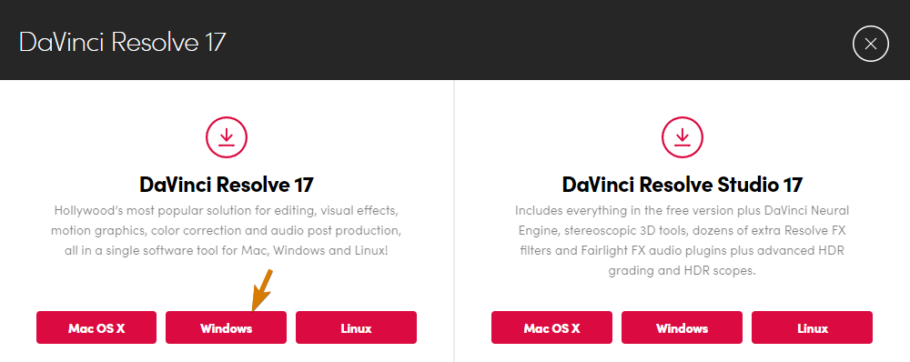
- On the website, scroll down until you see this button:
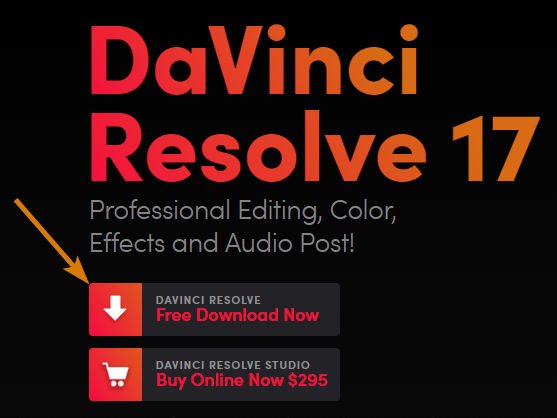
- Following this action, you’ll see a modal, or pop-up appear that has the two versions of DaVinci Resolve 17
- The free version is the one that does not say “Studio” in the name.
Once you download the installer for Windows and open the executable, you’ll be greeted with several steps in the install process, the first being the installation of Microsoft’s Visual C++ Redistributables.
Following that, you’ll be greeted with optional software to install alongside DaVinci Resolve 17 –
- Postgre SQL
- DaVinci Control Panels
- BlackMagic RAW Player
- Fairlight Audio Accelerator Utility
- DaVinci Resolve 17 (Required)
- Fairlight Studio Utility
The only required piece is DaVinci Resolve 17, but some of the other software in this package could potentially be useful for you later. I’ll be covering these utilities in later articles Once you have made your selections, you can select the “Install” button.
Once the install process completes, you can select “finish”, and move on to the next step.
Upon launching Davinci Resolve 17 for the first time, you’ll be given a brief welcome tour, which you are able to skip should you choose to. This is also the point where the program will scan your computer to ensure it is fast enough to be able to run – if you fail the check, then you’ll need to use another program to edit your video content, such as an online editor. The organizational work you did above is not wasted though.
If you pass this check, then you can continue on to the next step, which prompts you to set up the resolution for your first project – this isn’t all that important, and it can be changed later.
In the next step, you’ll be asked to choose a shortcut profile – I recommend sticking with DaVinci Resolve’s defaults unless you are very familiar with the shortcuts utilized in another video editor within this list. So you know, any article referencing shortcuts on this blog for DaVinci Resolve 17 will be utilizing the DaVinci Resolve default shortcuts. Additionally, any video tutorials you look up on youtube may become difficult to follow if you choose another program’s shortcuts.
DaVinci Resolve lets you choose keyboard shortcut profiles from the following programs:
- DaVinci Resolve (Default)
- Apple Final Cut Pro X
- Avid Media Composer
- Adobe Premiere Pro
Once you’ve made your selection, click – “Continue”.
You’ve now completed the welcome tour, and should see a screen that looks a little bit like this:
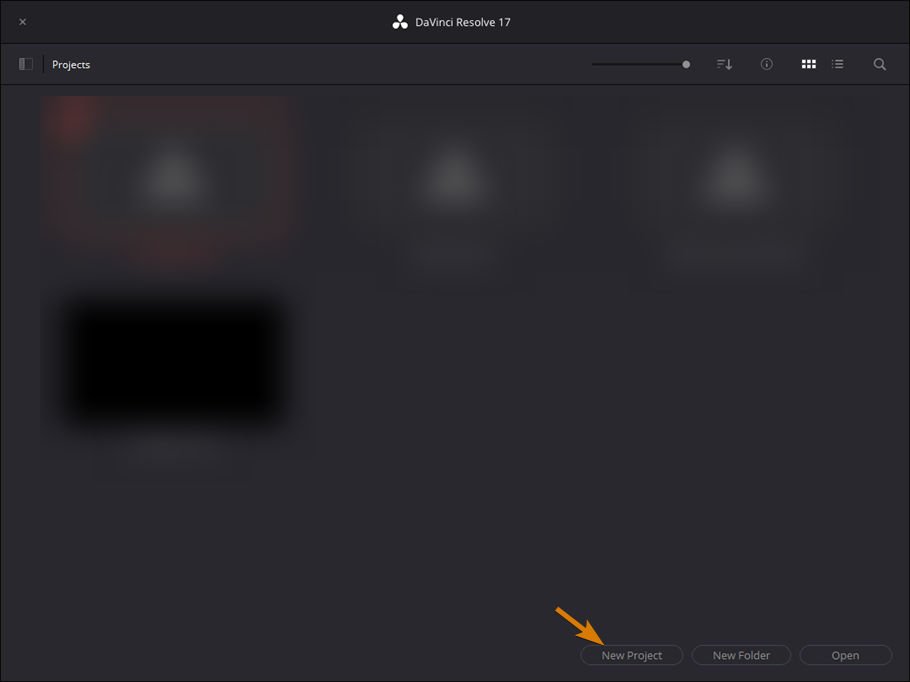
Note the three buttons at the bottom – New Project, New Folder, and Open. Simply select a new project for now.
The final steps I’ll be covering in this article will be to set your video project folder to the folders mentioned in the second heading.
- Click on Davinci Resolve in the menu at the top, next to file
- Select Preferences
- Select Media Storage
- Select System
- Click Remove
- Click Add
- Navigate to the Video Project folder you created in the first step
- Click Save
Once this step is complete, DaVinci Resolve 17 is ready for your creative process to begin. You merely need to get started.