


Hi there, welcome to Streamer’s Haven!
So, normally, I write about live streaming, but for this article, I will be going over something very closely related. Mainly because this helps flesh out my coverage of OBS studio, but also because creating YouTube content is a proven way that will push you towards becoming more discoverable as a live streamer. Understanding how to get the most out of your tools is one is an important step towards this.
If you haven’t started a YouTube channel yet, then you are missing out on a big opportunity to put your content in front of a huge number of people.
With that said, there are limits to how far you can go with certain hardware. If you push the limits of what the program is capable of, to utilize the Best OBS settings for recording possible, then you may find them bringing your system to heel.
Table of Contents
Wait, there is no one group of settings that are the best?
There are a number of factors at play when ultimately determining what the best settings for recording are for you and your system. Unfortunately, this also means that each configuration needs to consider your specific hardware limitations.
One of the biggest limiting factors on what settings would be best for you happens to revolve around your storage solution. For example, if you plan on recording lossless 4k video, and then archive it, then you need to understand that you will need to heavily invest in a media storage solution that can handle that. Otherwise, you’ll find yourself out of room on your PC, and that can grind your creative processes to a halt very quickly.
This is because of the sheer quantity of pixel data that is stored for each frame.
- A 4k image has 8,294,400 pixels in it,
- Your recording frame rate determines how many of these images are displayed each second.
- That means that you have a jawdropping 248,832,000 pixels at various color states being recorded every single second*
- *when recording a 4k 30 fps video.
- This is an astounding quantity of data that rapidly builds up.
So If you don’t have multiple terabytes of storage, and you like to record at 4k, then you will have to make a compromise on the visual fidelity for the sake of storage practicality. That, or to transfer your older work onto an external drive for cold storage. Just remember, Data isn’t forever – expect it to last 9 to 20 years on a traditional HDD storage device. SSD’s are even worse, with data lasting merely a year if unpowered from consumer-grade drives, and in some cases, a paltry one week from enterprise SSD’s, according to that source. HDD’s are still the king of long term storage(and why I still have two in my system for backups.)
Or you could not archive your data, but then you are deleting potential B-Roll footage for later videos. ¯\_(ツ)_/¯
What is the Best Recording format for YouTube?
One of the most frustrating things that can happen during recording a YouTube video is some sort of interruption to your recording itself – A program crashes, a power surge, or your little brother hits the relay on your power strip as a joke, to name a few. If you were recording that take using a traditional video format, such as MP4, then that take is toast.
It is for this reason that the best recording format for YouTube is MKV. While this format adds an additional remuxing step to your video editing workflow, since most editors can not open an MKV format video by default, it comes with peace of mind. If you were to record directly to MP4, then the files that are interrupted during a recording session become corrupt and are essentially a total loss. OBS, despite all of my praise in many of my articles, will still on occasion crash. It is for this reason that taking that extra step of recording first to MKV is important.
At least if you want to limit the total number of retakes you have to do.
How to remux your MKV recording to MP4 in OBS Studio
To remux your MKV recordings in OBS Studio to MP4:
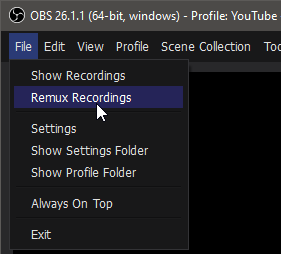
- Click “File”, located in the top left of the window.
- Click Remux Recordings
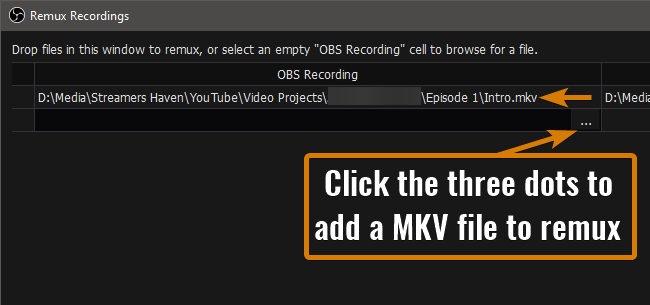
- Ensure your MKV format file is selected (click the three dots, and select the video to be remixed)
- Click the “Remux” button
After a few seconds to a minute, your video will have been processed into the mp4 format, which is the format that will go into your video editor of choice. I recommend Davinci Resolve, as it is, in my opinion, the best free video editor available on the market. The Professional version is also very reasonably priced, in case you wanted access to the full suite.
In fact, if you do decide to get started with DaVinci Resolve, I’ve started to cover it here on Streamer’s Haven. You can get started in your learning this powerful video editing software.
There are many other recording formats available to you, but MKV has served me well over the years, and reliability is important. So for now, it remains my recommended recording format. Feel free to test them out for yourself to figure out which one performs best for you.
What is CQP & CRF?

CQP stands for “Constant Quality Profile”, and CRF stands for “Constant Rate Factor”. These two recording options are Rate control formats that will tell the encoder to throw as much bitrate as necessary at the recording process to maintain a constant quality video output. This is easily the best option for recording a consistent video fidelity across the entire process.
CRF is available only for the X264 Encoder, while the CQP setting is available to both AMD and Nvidia cards. The lower the number entered into the setting, the higher quality the video will be, up to 0 for 1:1 lossless. The closer that it becomes to lossless, the larger the file size of the recording, and the faster it will consume your drive space. A good median to aim for is 16-20, Which will ensure a nearly imperceptible loss of video fidelity, while keeping the file size at a manageable level.
The Best OBS Settings for Recording YouTube at 1080p 60fps
| Quality Preset | Rate Control Method | I,B Frame QP | Keyframe Interval | Minimum Storage |
|---|---|---|---|---|
| Quality | Constant QP (CQP) | 15 | 2-5 | 4TB HDD || SSD |
| Quality | CQP | 18 | 2-5 | 2TB HDD || SSD |
| Quality | CQP | 22 | 2-5 | 1TB HDD || SSD |
For 1080P 60 fps, the best OBS settings to use for recording a YouTube video are to use the CQP Rate Control Method and put the I-frame, P-frame as low as you can without causing it to devour your disk space. The best I-frame and B-frame settings for CQP will vary based on the size of your storage solution – See the table above for my recommendations on that. This, coupled with the “Quality” quality preset will ensure that your video will be crisp.
To modify your recording settings in OBS to match the ones outlined above:
- Click Settings
- Click on the output tab in the left
- Select “Advanced” in the Output mode selector
- Click the Recording tab
- Keep the type “Standard”
- Select “New NVENC” or “H264/AVC Encoder (AMD Advanced Media Framework)”
- Leave “Rescale Output” unchecked
- Ignore “Custom Muxer settings”
- Leave “Preset” blank
- Select “Quality” in the Quality Preset
- Adjust the I-frame/B-frame to the values in the table above
- Set Keyframe interval to 2-5
- Leave View mode at Basic
- Click on the Video tab on the left
- Set your Base (Canvas) resolution to match your display’s native resolution
- One exception is Ultra-wide Displays. You will want to force 1080p or 1440p or whatever on those displays when recording your screen
- This avoids large black bars from being added to the top and bottom of your video when uploaded to YouTube
- One exception is Ultra-wide Displays. You will want to force 1080p or 1440p or whatever on those displays when recording your screen
- For Your Output (Scaled) Resolution, set it to match your base canvas setting.
- Downscale filter is fine at Bicubic – You aren’t rescaling output, so this setting is unused.
- Ensure your Common FPS value is set to 60.
If you have a larger resolution display, such as 1440p or 4k, then you will want to instead set the Base canvas to match your native resolution, and then set your Output (Scaled) resolution in the video settings to 1080p.
Regarding the range on the Keyframe interval, it is important for live streaming, given that Twitch pretty much dictates that you use a keyframe interval setting of 2 seconds. However, there are some sources that suggest that having a higher number of results in better quality for the purpose of recording without much clarification on what effect it has on the video. Personally, I don’t see any real difference between 2 or 5 for the purpose of recording in my testing. Maybe I’m blind, or maybe it doesn’t matter that much. ¯\_(ツ)_/¯
Keep it at least 2, as the default of “0” is a flag for OBS to decide for you…and it doesn’t always do a good job of making that decision.
As for my recommended minimum storage recommendations, this has to do with the file sizes of the videos that result from these settings. As stated earlier in the article, there is a lot of pixel data to record, and the more accurate the recording becomes, the more data that is required to represent the video file. AKA, the video files get bigger with greater levels of quality.
As for higher than 60 fps videos – YouTube does support high refresh rates, however, it isn’t worth the extra file size that it costs, in my opinion. Plus, 120fps footage on a 60 fps timeline means you can get slow-motion footage or super slow motion footage on a 30 fps timeline with no visual artifacts. This is a nice boost to b-roll production value (Side note, here are some plugins for OBS that can boost production value), especially if you have any product displays on a rotating pedestal.
What about recording at 720p 60 fps? Does it change?
For the most part, the settings in the above table will work just as well at 720P 60 fps as it does for 1080p 60 fps, and even 4k 60 fps, really. This is, again, because of how CQP and CRF works. The only thing that really changes is the file size, and minimum recommended storage.
- CQP/CRF 15 – 1TB HHD/SSD Minimum
- CQP/CRF 18 – 512 GB HHD/SSD Minimum
- CQP/CRF 22 – 512 GB HHD/SSD Minimum
An additional benefit of 720p footage is that it will perform better with lower end pc components, particularly in the editor’s timeline if your pc doesn’t have access to a lot of RAM. This makes the editing process a much more streamlined experience, giving you the ability to quickly jump from one positon to another.
As for 4k, Expect to double, or even triple the recommended minimums listed on my 1080p recommendations If you are in for the long haul on YouTube.