OBS Studio is quite possibly the best broadcasting software available at the moment. With that said, it is quite intimidating and complex looking at first glance, and you’d be right; it totally is. However, If you follow these 5 Simple OBS tips I have compiled, you will be able to drastically improve how your stream looks, with only a few minor tweaks. Not only will it make your stream look better to your audience, but you may actually improve the performance of the tool as an added benefit.
In fact, you might end up fixing some of your issues without even meaning to. Some of these tweaks eliminate or significantly limit issues like dropping frames, stuttering, or buffering.
Table of Contents
#1 OBS in Administration mode = better streaming performance
| Video performance improvement: | Colossal |
| How hard to implement? | Somewhat Easy |
Everybody should be running OBS Studio in Administration mode. It is such a simple fix that resolves several possible issues, and there are no downsides other than the inconvenience of it needing to be set manually. The first thing you should do is create a shortcut to run OBS Studio in Administration mode.
Alternatively, you could also create a start bar pin, as I prefer doing. This method will declutter your desktop. At any rate, to enable Administration mode, follow this short guide:
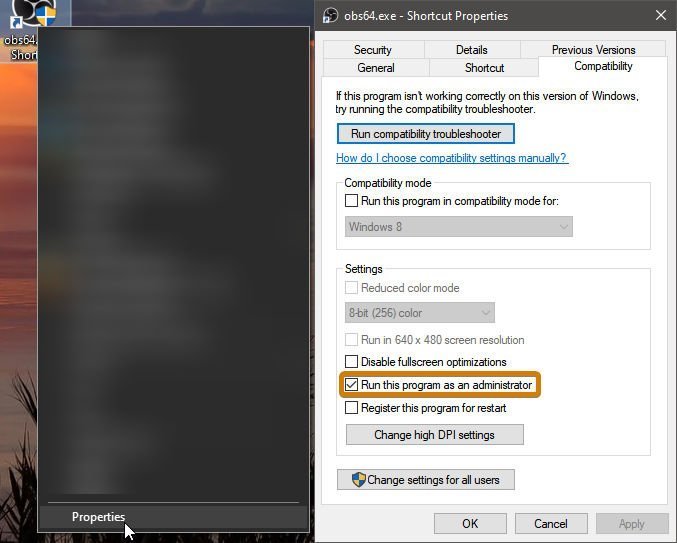
- Find your OBS Studio Shortcut and right-click it.
- In the prompt that pops up, click properties
- You’ll see a window pop up that has Six tabs at the top. One of those tabs is labeled Compatability. Click it.
- In this Window, there are two sections with checkbox inputs. Look for the one that says Run this program as an administrator and check it.
- Click Apply.
- And finally, click OK
Why is this needed? How will it make your stream look better?
Windows is a right pain in its ability to properly allocate resources to multiple programs simultaneously. By forcing the program to run in administration mode, you are assigning a priority for resources to be sufficiently allocated to the program to do its job. OBS will no longer have to struggle with the dredges of your video card utilization from your streamed game of choice, and this will coincidentally eliminate or substantially reduce dropped frames.
You can further optimize the GPU utilization of the program by disabling the preview window, though many of you would prefer to not do that.
Credit to EposVox for the original findings.
Tip #2: Lower system Impact by using GPU encoding in OBS
| Video performance improvement: | Large |
| How Hard to Implement: | Very Easy |
If you have had a chance to look into the best streaming settings at some point, many older videos and articles will advise that you utilize the X264 encoder. Some even advise you use a dedicated streaming PC to do your encoding.
While this is a viable solution, recent NVIDIA cards have an onboard hardware encoder that will do the same job, at almost the same quality standard as X264.
The difference is that it achieves this result without a massive reservation of CPU resources. As a consequence, using the GPU Encoder for NVIDIA cards that come with the latest encoding technology will make your stream look better without impacting your system performance.
I will say that there is some overhead on the PCI-E lane, but the silicon is otherwise separate from the system. There are additional benefits from this as well, such as improved in-game fps, which can improve the quality of your stream further if you were dipping below 60 fps while live.
As for AMD card users, the benefits you gain are not really comparable to NVIDIA. Sure, your performance will be less impacted by using the H264/AVC (AMD Advanced Media Framework). However, it will be at the cost of substantial loss to graphical fidelity, as AMD’s encoder doesn’t do well with the low bitrate limits of live streaming on Twitch. An argument can be made for AMD users to consider X264 encoding in light of this.
OBS Tips #3: Limit the total number of Scenes & Sources
| Video performance improvement: | Potentially Moderate |
| How hard to implement: | Very Easy |
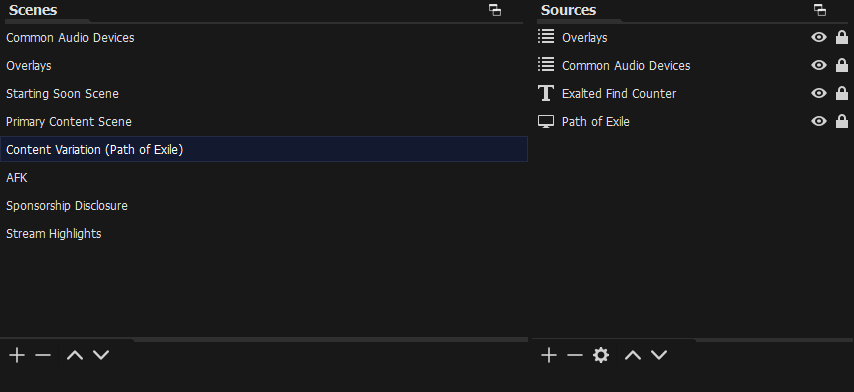
The next tip on the list involves the number of scenes and sources you have within a Scene Collection. Each and every source you add will increase the processing needs of OBS. It is for this reason that I recommend that you limit your scenes to the essentials and develop a list of several Scene Collections if you need some different ones for a different game or project you are working on.
I also recommend setting up your audio sources in a specific way, which has a number of advantages, including the reduction of source calls across your various scenes. In fact, adding too many sources can actually cause OBS to freeze and even crash.
The maximum number of scenes I recommend per collection is 25, and the maximum number of sources per scene should be around 20-35 or so. Different source types will affect the performance of the program in different ways.
The maximum number of scenes I recommend per collection is 25, and the maximum number of sources per scene should be around 20-35 or so.
OBS Tips #4: Avoid using 1080p 60 fps on Twitch
| Video performance benefit: | Pretty high |
| How hard to implement: | Very Easy |
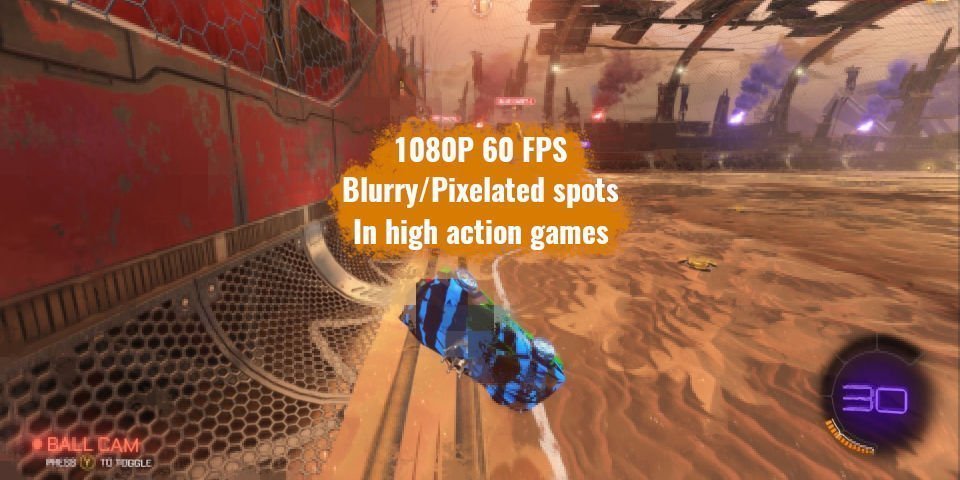
Look, I know you like 1080P, 1440P, 4k, etc. However, I can not recommend that you stream at 1080P 60 fps. At the absolute limit, you could get away with 1080p30, but the extra 30 fps is simply too much for the encoder to keep up with all that pixel data. Let me explain.
There are a number of issues that will arise. Most importantly, is that it will introduce compression artifacts and blur your stream by quite a margin as a result. Even if you are actively streaming on Twitch at the 6000 bitrate limit, the truth is, it will struggle. In order to stream 1080p60 without substantial blurring, or compression artifacts, you will need at the very least 12,000 Bitrate allocated to your stream, which is double the limit imposed by Twitch.
Not to mention, your upload speed would need to be sufficient to actually push the 12,000 bitrate needed, and if you don’t have the upload speed to keep up with the demand, then the quality of your video will plummet even further. It is simply not worth the effort.
Now, I will say that if you intend to stream on YouTube, you can stream 8k60 fps in HDR if you want to, assuming you have the insane upload speed necessary to pull off that feat. This is possible because YouTube has guaranteed transcoding and imposes no limits on bitrates, resolutions, or fps. Just know that OBS Studio works best with FPS that are multiples of 30.
If you’re wondering how to switch OBS to stream at 60 fps, check out this article.
What Resolution Should You Stream at on Twitch?
The resolution that you choose will be determined by two things:
- Having a decently fast computer
- And whether or not you have a fast, and stable internet connection.
If you have both criteria covered, then you can stream roughly at a maximum of 936P 60fps without encountering significant compression artifacts at the maximum official bitrate of 6000. With that said, this resolution is really pushing the limit at 6000 and will perform much better at the unofficially supported bitrate of 8000. Just be aware that you will be very unlikely to get transcoding (Learn what that is) for your stream at this resolution and bitrate.
However, to accommodate users with slower connections or users who are using a metered internet plan, I recommend sticking to the standard of streaming at 720P60. There is a reason that this is the most popular resolution to stream at.
Whichever resolution you ultimately decide to go with, just ensure you choose CBR as your rate control, as that will ensure you get the most out of the bitrate.
Keep your Audio Bitrate at a low-ish number – 160 Is Ideal
Update: Twitch changed how things worked – you now have access to 320 bitrate specifically for audio and up to 6000 for video. This last point is now invalid. Please disregard it. I’ll be updating this post with other ways to boost the performance of your streams soon.
| Video performance benefit: | Somewhat low |
| How hard to implement: | Very Easy |
You might be wondering how setting the audio bitrate could possibly make your stream look better. I mean, they are completely unrelated things.
Aren’t they?
Well, I have a valid reason for mentioning this. The target bitrate setting that you apply to your stream in the output settings will share said bitrate across both the video portion of your stream and the audio. By reducing the audio bitrate reservation, you could potentially free up a tiny amount of bitrate resources to be allocated to your video. The result is that your video quality will improve slightly.
The target bitrate setting that you apply to your stream in the output settings will share said bitrate across both the video portion of your stream and the audio.
I won’t lie, the benefits are very slight, but it does make it look better, at an imperceptibly tiny loss of audio fidelity. I daresay that the improvement to the video is noticeable, hence the recommendation.
To change this setting, follow this short guide:
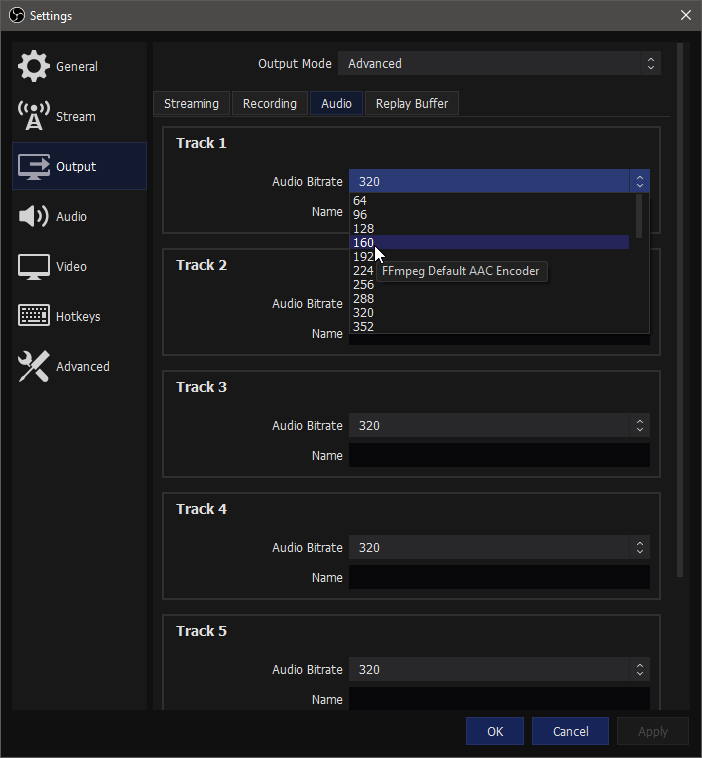
- Open OBS Studio
- Click File at the top left, and then select Settings
- In the left side menu, click Output
- In the streaming tab, click the radial button next to Audio Track labeled 1.
- There are four tabs underneath “Output mode”. Click “Audio”
- Set Audio Bitrate for Track 1 to 160.
While you are in there, you can set the rest of the tracks to 320 if you’d like. Those tracks are specifically for recording, where you actually want the highest audio quality possible.
Unfortunately, this option does nothing for Audio Sync issues, but it does help the video quality!


