

This OBS encoder settings guide is designed to set you up for live streaming and recording at High Definition [720p] resolution. There isn’t much you need to change to support different resolutions, merely the bitrate and the output resolution. 720p is used because it is a standard resolution widely used across live-streaming platforms for its great middle-ground position between quality and bandwidth/system requirements.
Table of Contents
For Live Streamers
These OBS encoder settings are optimized for the purpose of live streaming. If you intend to record, The table of contents above will handle skipping this content.
Step 1: Verify Your Internet Upload Bandwidth
For the purpose of live streaming encoding, you should verify your internet upload bandwidth limit. This is important for determining the upper limit of your bitrate capabilities. Please keep in mind that if you share the internet with other people in your family, then you may want to leave some headroom so that you don’t experience random drops in encoding quality when others inevitably use the internet.
My internet upload speed article details how to properly check this.
Step 2: Configure the Resolution
Go to Settings > Video to configure the parameters covered in this section

Before we get into the specific encoder you will be using for live streaming, we first need to set the resolution we are going to be using. This value can be set in the Video tab of the OBS Settings window.
Base (Canvas) Resolution
Your Native Monitor Resolution (The option at the very top)
Output (Scaled) Resolution
1280×720
Downscale Filter
Depends on personal preference – I like Bicubic (Sharpened Scaling, 16 samples) over Lanczos.
Common FPS Values
60
Exception: If you are unable to maintain 60 fps in your content, you will have a better quality live stream if you limit it to 30 fps. Consider Frame Limiting your game to 60 fps to avoid weird frame issues.
– Monodex
Step 3: Figure Out your Content Scope
Your content scope is what you intend to stream. This matters greatly in what encoders will work best for you.
For example, live streamers who only do “Just chatting” type streams are able to use really any encoder they like. This is because the only thing that the computer is doing is dealing with the stream itself.
The computer’s processing power is devoted to encoding frames, so it performs better than if divided between encoding and computing game logic/rendering.
But, if you intend to have gaming as your primary content, you’ll want to put that into consideration when choosing the encoder. Both will do the job – one will just do it slightly better than the other.
Step 4: Choose an Encoder
Go to Settings > Output to configure the parameters covered in this section

When using an NVIDIA GPU like my RTX 3060 TI or earlier paired with an AMD CPU, there are only two options to choose from:
- NVIDIA NVENC H.264
- x264
Between these two options, you should almost always choose NVIDIA NVENC H.264 unless you are experiencing some sort of issue with that encoder preventing you from going live.
The reason behind this is that x264 puts a substantial load on the CPU, taking up as much as 40% of processing power on medium or slow. This results in a significant drop in the system’s performance overall, enough to push some games under 60 fps in some cases if you intend to make gaming content on Twitch.
Consult my Encoder Ranking list if you’d like more detail on how each encoder works.
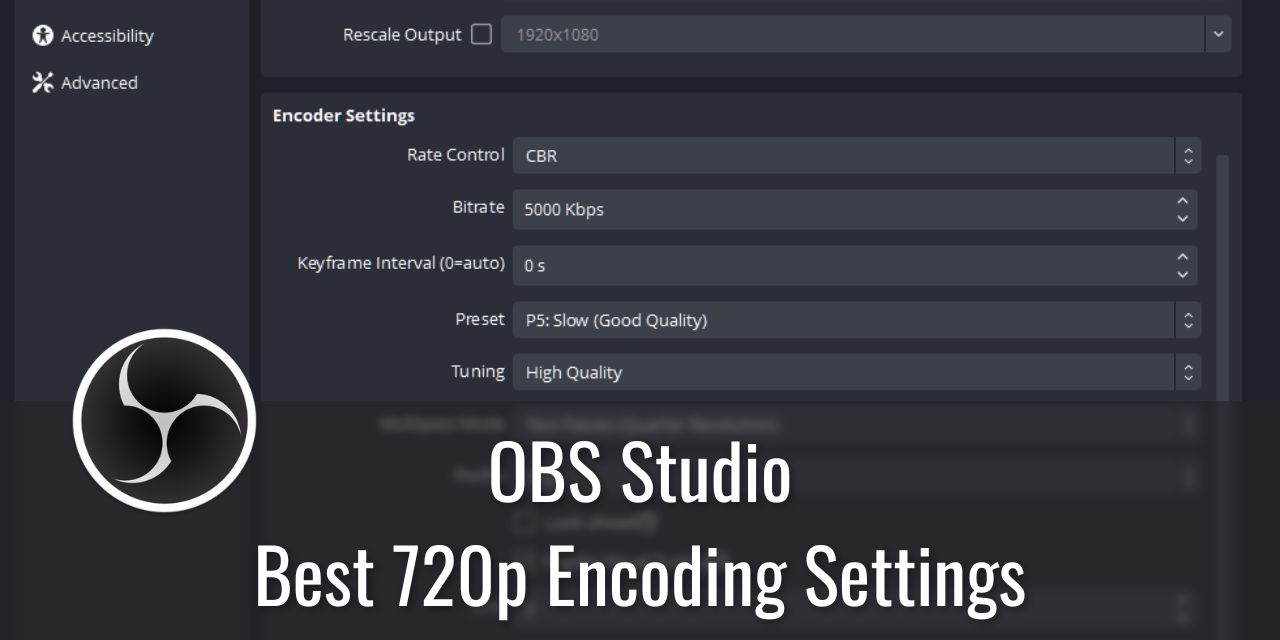
Best OBS Encoding Settings for Live Streaming Using NVIDIA’s NVENC H.264

These OBS encoder settings can be changed within the Output tab within the OBS Studio Settings. They are tuned specifically for live streaming at 720p 60fps.
Rate Control
CBR
Bitrate
5000
Keyframe Interval
2
Preset
P5: Slow (Good Quality)
You can mess with this value to determine what works best for you. Some games will work better with other values here.
– Monodex
Tuning
High Quality
Multipass Mode
Two Passes (Quarter Resolution)
I did not see a significant advantage to going two passes (full Resolution) in my testing
– Monodex
Profile
High
I didn’t really notice a difference between changing this value. I don’t think it matters that much based on my testing.
– Monodex
Look-Ahead
Game Specific
This setting is important for certain games, and will make a big difference in image clarity. However, it adds overhead, and can reduce encoding performance based on the way the game you are playing is coded.
It should be disabled if you are not creating content that requires GPU power.
– Monodex
Psycho Visual Tuning
Content Specific
Psycho Visual Tuning allows the encoder to degrade some parts of an image to enhance other parts. This results in an overal percieved quality improvement to the human eye. It is very specific to the content you make on whether it is useful or not.
Try it both ways, and determine which looks better to you and your audience. It doesn’t matter that much if you leave it off though.
– Monodex
GPU
0 (Unless you have a second GPU in your system for some reason)
Max B-Frames
2 if Look-Ahead is disabled | 4 if Look-Ahead is Enabled
If you intend to stream at other resolutions, such as 936p or 1080p, the only value you need to change here is the “Bitrate.” Consult my resolution guide for what bitrate works best at various resolutions.
For Recording
Recording content is not restricted to the capabilities of your internet upload speed. Instead, the performance and storage capabilities of the computer are what matter.
Step 1: Configure the Resolution
Go to Settings > Video to configure the parameters covered in this section
Unlike Live Streaming, the only limit to what resolution you decide to go with is your ability to store videos on your computer. If you have high-capacity storage (3+ Terrabytes of video-only storage), you can safely record at your native resolution without worry. At least for a while.
However, these videos add up – if you intend to keep all the raw footage after the fact for use in B-roll content, remember that it isn’t unheard of for storage needs to exceed a petabyte or more (1,000 terabytes!). This makes recording long-term an expensive endeavor.
If you want to keep this sort of situation under control for a longer period of time, consider limiting your recording resolution to 1080p or even 720p.
Base (Canvas) Resolution
Your Native Monitor Resolution (The option at the very top)
Output (Scaled) Resolution
Native Resolution, down to 1280×720
Your ability to store your content will determine what resolution of video you should use.
– Monodex
Downscale Filter
Depends on personal preference – I like Bicubic (Sharpened Scaling, 16 samples) over Lanczos.
Common FPS Values
30
Recorded video does not need to be 60 fps. Movies traditionally use 24 fps, and there are artistic interpretations that are even lower, such as Into the Spiderverse, where Miles moves at 12 fps until he gets his powers.
There is no reason to go higher than 30 here.
– Monodex
Step 2: Choose the Encoder
Go to Settings > Output to configure the parameters covered in this section
There are five encoder options available for recording:
- SVT-AV1
- AOM-AV1
- NVIDIA NVENC H.264
- NVIDIA NVENC HVEC (H.265)
- x264
While the AV1 options are the best encoder tools available in OBS Studio, they have a severe lack of compatibility with even high-end midrange components. My AMD Ryzen 9 5900X struggles to maintain recording for longer than 30 seconds, and that is with even the lowest quality preset that is available.
As a result, unless you get yourself an Intel ARC GPU, which supports AV1 in silicon, get NVIDIA’s RTX 4000 series or newer, or invest in a Media Accelerator Card, AV1 is still out of reach for a vast majority of you.
So which one to choose?
That leaves only 3 of the 5 options as viable encoders for recording in OBS Studio. Once again, with compatibility in mind, although NVENC HVEC is arguably better than NVIDIA H.264, with better file sizes for comparable quality, the H.265 standard is one that most video platforms do not support due to licensing costs. This eliminates HVEC as a recommendation as a result.
So that leaves the two options: NVIDIA NVENC H.264 and x264.
- x264 is better quality and has a smaller file size output but gives a system-wide performance hit when in use.
- NVIDIA NVENC H.264 is slightly worse quality and has a bigger file size output but does not substantially impact system performance.
The one I recommend is NVIDIA NVENC H.264.
Best OBS Encoding Settings for Recording Using NVIDIA’s NVENC H.264
Go to Settings > Output to configure the parameters covered in this section
These settings are the best OBS encoding settings for recording
Recording Path
I recommend creating a directory for raw footage. Ideally, you’d update this between recording projects to stay organized.
Recording Format
MKV is the format I recommend. Recordings can be recovered with this format if your computer or OBS crashes. It adds a Remuxing step to the process, but the peace of mind of not losing your content is worth it.
Encoder
NVIDIA NVENC H.264
Rescale Output
Unchecked (We set it in the Video Tab above.)
Custom Muxer Settings
Blank (Super Users could get more out of the encoder with this, but it is not worth the hassle)
Automatic File Splitting
Useful if you record long segments at a time. Potentially Helps with editing too, AND keeps file sizes low. An extra benefit if you decide not to use MKV is that you won’t lose hours of content, only the last 15 minutes.
Rate Control
CQP
CQ Level
16-22 (Larger number = smaller file size and lower quality | 0 = Lossless, large filesize)
Keyframe Interval
2
Preset
P5:Slow (Good Quality) | Great Balance between video quality and file size
Tuning
High Quality
Multipass Mode
Two-Passes (Quarter Resolution) | Experiment with this for best results – It varies from game to game
Profile
Depends on your system – Try high first, then main, then baseline.
Look-ahead
Disabled
Psycho Visual Tuning
Disabled
GPU
0
Max B-Frames
2 | 4 If you turn Look-Ahead on
What is the Best Overall Encoder?
Currently, the best overall encoder in terms of encoding capability at low bitrates that OBS Studio supports is AV1. Unfortunately, AV1 is extremely demanding on the hardware used to encode it. It is not even an option unless you have an Intel ARC GPU or an NVIDIA RTX 4000 series GPU for live streaming, and performance is abysmal on even an AMD Ryzen 9 5900X. (My CPU) for recording.
In the future, as the AV1 encoder support matures, this guide will be updated to reflect the recommendations.
FAQ:
Can you Stream and Record using the Same Encoder simultaneously?
Yes, you can simultaneously use the same encoder for streaming and recording. However, if you are using x264, you may experience additional performance degradation.
What encoder is better for streaming?
At this time, the best encoder for streaming overall is NVIDIA’s NVENC H.264. This is the best quality to performance for single PC streaming machines. However, this may change soon once AV1 support becomes more mainstream.
Which is better NVENC or x264?
NVENC is better if you are limited to using a single PC for Gaming and Encoding. x264 offers a higher quality potential when configured for maximum output and doesn’t need to share processing power with other tasks like gaming.
Does OBS use CPU or GPU encoding?
OBS uses both CPU and GPU encoding. x264 is CPU, NVENC is GPU, AMF is GPU, and AV1 is both(On supported GPU or AM cards).
Why is OBS using so much GPU?
OBS composites and renders a scene using the GPU. You can reduce the load on your GPU by making simpler scenes, disabling the scene preview window when live/recording, and by setting OBS to run in Administration mode. There are additional tweaks you could do to lower it further, but their effect is negligible.
Does OBS need a good GPU?
Not particularly – there are dozens of designs that are under $100(used) that perform admirably as an encoding card.
Should I get a second GPU for a dedicated encoding Card?
It is completely unnecessary to get a dedicated GPU for the purpose of encoding on OBS Studio. There is only a negligible difference between a single and dual GPU system, and the increase in power draw simply isn’t worth the power draw and extra heat in the system.