Trying to just record audio using OBS Studio? Using this handy little guide, you will learn the audio recording process using this broadcasting program. I will say that it is a little bit more involved than recording using dedicated audio recording software like Audacity or Reaper DAW, but it does come with some advantages as well.
Table of Contents
Caveats to Recording Audio Using OBS Studio
The downside of using OBS Studio to record audio is that you can’t actually record audio. However, you can record a blank video, then use another tool to convert it to just an audio file. The result is the same, though it does add an extra step to the process. Still, it has some advantages as well.
Advantages of Recording Audio Using OBS Studio
The big advantage of recording audio using OBS Studio is to have the ability to record up to 6 individual audio tracks at a time. This is very useful if you, say, have a band and need to record individual instruments using dedicated microphones.
This allows you to record the song, and then separate out each instrument in post. This then allows you to master individual instruments, apply special VST filters to them, and not affect the sound of other instruments when you do this.
Setting up OBS Studio for Audio Recording
All you need to do to get OBS studio set up to just record audio is to add your audio sources, and make sure each source has it’s own track if you want to gain some control over the audio in audio editing software like Reaper.
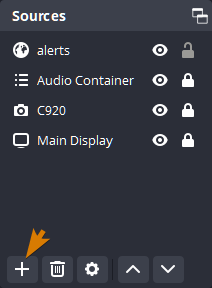
To add an audio source to OBS Studio:
- Left Click the + button under the sources dock

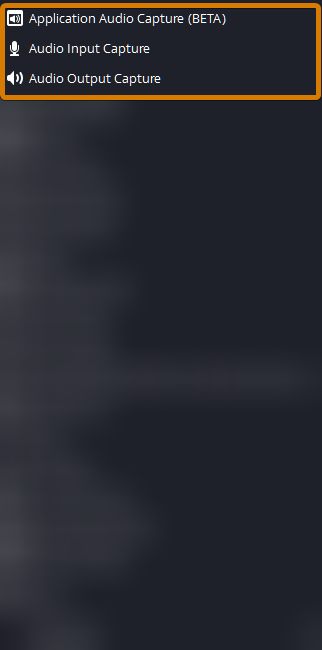
- Select one of the three audio source types

Configuring Audio Sources
If you’d like to gain a bit more control over the audio sources in your editing program of choice, you can set up to 6 unique audio tracks. This allows you to control up to 6 tracks independently from each other.
- Open up the Advanced Audio Properties
- Configure each source to its own unique track
This is purely optional and only necessary if you have a specific need to record up to 6 individual tracks.
Recording Audio
Simply select Start Recording. OBS Studio records using the .MKV format video file, which will need to be converted to an audio file in the next step.
Converting Video Files to Audio file format
Now, to strip the video from the recording, you can use a simple online MKV to MP3 converter, like Cloud Convert. This is a great solution if you don’t care to record sound sources individually.
However, if you do need to record separate audio tracks at the same time, you’ll need to download FFmpeg. Then, you’ll need to create a text file and save it as a .bat. I recommend using Notepad++ to create this file, as it has helpful syntax coloring and doesn’t force .txt at the end of the file.
Next, enter this code into your newly created .bat file:
SET input_file="my_recording.mkv"
ffmpeg -i %input_file% -map 0:a:0 "track1.wav"
ffmpeg -i %input_file% -map 0:a:1 "track2.wav"
ffmpeg -i %input_file% -map 0:a:2 "track3.wav"
ffmpeg -i %input_file% -map 0:a:3 "track4.wav"
ffmpeg -i %input_file% -map 0:a:4 "track5.wav"
ffmpeg -i %input_file% -map 0:a:5 "track6.wav"
pause
You’ll need to replace the my_recording text with whatever you named your .MKV file for it to work. It will output 6 different audio files with the defined names, “track1.wav”, “track2.wav” and so on. If you know what each track is supposed to be, you can change the track1 to say, Spotify, or whatever you have tied to the track.
try to use all lowercase, and avoid using spaces in the names. I use – or _ for spaces.
SET input_file="different_file_name.mkv"
ffmpeg -i %input_file% -map 0:a:0 "Spotify.wav"
ffmpeg -i %input_file% -map 0:a:1 "Twitch.wav"
ffmpeg -i %input_file% -map 0:a:2 "example.wav"
ffmpeg -i %input_file% -map 0:a:3 "Birds.wav"
ffmpeg -i %input_file% -map 0:a:4 "Blarg.wav"
ffmpeg -i %input_file% -map 0:a:5 "ETC.wav"
pause
Once done, you can save the file, then double-click it to run the batch file you just created, which will create the 6 unique tracks with the names you defined. Just make sure you don’t forget the period between the name and WAV, otherwise, the batch script may error out.

