

Have you ever found yourself unintentionally talking much louder during moments of high excitement, responding to somebody who says “What?” or just managed to stub your toe while live? When these situations occur, the first thought on your mind probably isn’t to turn down or mute your microphone, especially if stubbing your toe is the particular cause of your high-energy moment.
This is precisely where the OBS limiter shows what it’s made of and why you should probably include the filter at the end of your audio chain as a live streamer.
Properly utilized, this filter will prevent most cases where an undesirable audio issue, known as peaking, can occur. This is specifically important in professional audio – Musicians, Voice Actors, and yes, Streamers and YouTubers need to be aware of this tool. When used correctly, you can save a ton of time by limiting the instances you have to retake a recording due to peaking.
However, for live streamers who create their content on the fly, this tool becomes particularly desirable, as you can’t simply redo something live.
With that said, time to get into the details on the Limiter filter and how it can help you!
Table of Contents
What Does a Limiter Do in OBS?

Think of the limiter as though it was a super-powered compressor filter. It takes the input of a signal, checks the value of its volume in dB, and then hard limits the volume to a defined maximum once a threshold is met.
In plain English, the limiter filter in OBS prevents your microphone from sounding bad when you get too loud.
Think of the limiter as though it was a super-powered compressor filter.
What I mean by sounding bad is that the signal peaks out or clips. Peaking is an issue that all microphones can have, and it comes in two flavors:
- Hardware Peaking
- Software Peaking

Most of you will only ever encounter software-related peaking, and that is what a limiter can help prevent. If you manage to hardware peak the microphone – trying to record the wind during a hurricane or tornado, for example, you’ll hear that odd distorted rushing noise. That is hardware peaking, and there’s nothing you can do to recover an audio signal that has peaked in this way.
As for software peaking, this phenomenon occurs when your audio signal reaches the 0 dB maximum. When peaking occurs in this case, the detail within the signal is quite simply clipped off of the top, which results in significant distortion.
A limiter will sharply lower the signal volume to preserve signal integrity, preventing the distortion issue. The Limiter filter available within OBS Studio is baked into the software. It is really one of their best additions to the filter list, behind only the support for VST filters.
Is a Limiter Filter Needed?
The honest answer is no – this filter is not needed to provide clear audio to your recordings. With a properly configured microphone in a quiet environment, and good microphone speaking discipline, most filters become unnecessary. However, certain situations are out of your hands, which can help keep your audio signal clear from distortion.
I’ll be listing those in the next section, but your microphone speaking discipline is another important factor at play. For example, suppose you find yourself easily ticked off by competitive gameplay and partake in anger-fueled outbursts such as yelling in frustration. In that case, I do recommend that you use the limiter filter. It will save your audience’s ears from epic distortion.
When Should You Use a Limiter Filter?
There may be certain situations where the inclusion of the limiter filter may actually be detrimental. For example, if you are already using a compressor filter that handles the issue sufficiently, then a limiter may be unnecessary entirely. By adding a limiter, you only increase the total processing overhead in this case.
However, there are certain situations that everyday life sometimes presents you with at inconvenient times. The OBS limiter is designed to be a safety net, in these rare instances where uncontrollably loud noises reach the microphone:
- Barking dogs
- Screaming children
- Noisy cars
- Rude neighbors blaring music
- Trains
- Planes taking off at a nearby airfield
- Construction work
- etc.
If you are a victim of these scenarios, then a limiter can help moderate the volume of sound that ultimately reaches the microphone. However, for some more extreme situations, such as construction work, casual use of a microphone mute key is probably a better solution for your audience, especially when coupled with a limiter to reduce the harshness of the noise.
What’s the Difference Between Compressors and Limiters?
Fun fact – The limiter filter in OBS is simply a limited functionality compressor with a very high ratio. As I stated earlier in the article, you can easily use a compressor by itself and forgo the limiter entirely. However, the opposite is not true, due to the stripped-down nature of the filter to make it easier to use.
As for what you should use, I recommend that you utilize both. When you do so, you can back off on the compressor’s ratio, allowing you to reduce its impact on the signal. These filters aren’t perfect, and their use does affect the signal in subtle ways. Our ears can’t pinpoint exactly the problems that arise, but they are sensitive enough to notice that something happened that feels out of place.
That said, their benefits outweigh these subtle effects that crop up in most situations. Overall, these filters are a great addition to your audio toolset.
How Do You Use a Limiter on OBS?
A few steps are necessary to add the limiter to your audio source, but luckily, it is reasonably easy to do so. In fact, it’s only four clicks.
- Right-click your audio source
- This can be done from the “Sources” Window OR The Audio mixer itself
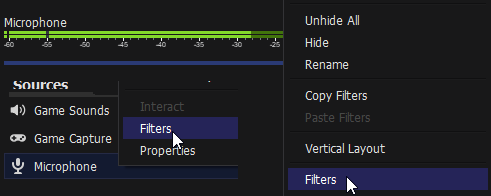
- Click Filters
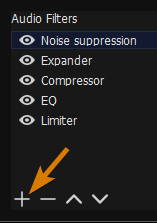
- Look for the + at the bottom left of the new window, and click it
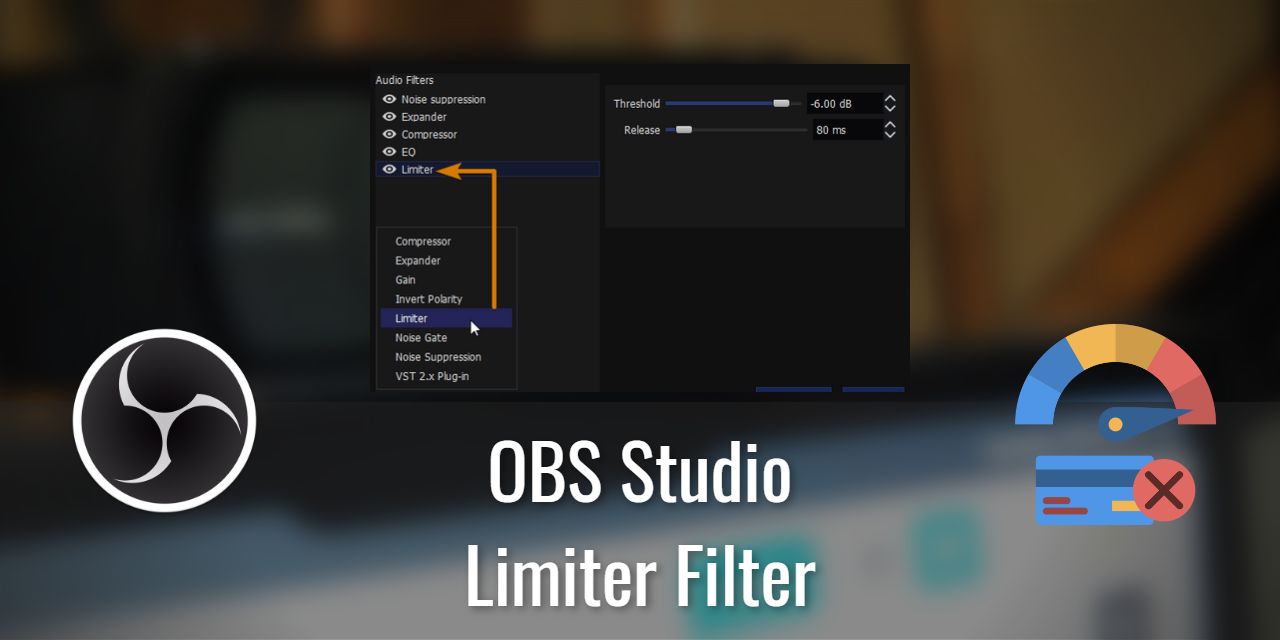
- Select “Limiter”
Et voila! Now you simply need to tune the filter a tiny bit, and you’ll be on your way to creating content without fear of inducing unwanted microphone distortion to your audience.
How Should I Tune the OBS Limiter Settings?
When working with the Limiter filter, two sliders control how it works –

| Threshold | Release |
|---|---|
| From my testing, a value of -13 dB to -6 dB works best | From my testing, a value of 50 to 80 ms is ideal |
If you’re playing with this filter, you don’t really want to set the threshold any lower than -13 dB because, by that point, it will kick in even from normal speech volume, assuming your microphone is within the proper speaking range of -15 dB to -10 dB range.
As for the release, setting this value too low can be detrimental by introducing micro-volume reductions as your signal brushes against the threshold value. On the other hand, you also don’t want to set it too high, as doing so will result in a larger window of overall volume reduction when there doesn’t need to be.
If you found this article helpful, feel free to join our community discord and say hello! I’m working on building a community for you guys to get help whenever you need it, and we’d be happy to welcome you to it!