

So, you’ve decided to start streaming on Glimesh, have you? That’s great! Streaming can be a very fun creative process, leading to new friendships with collaborators and community members as you grow your channel.
Using this guide, you’ll learn all of the steps you’ll need to take to get your channel started and begin your journey as a Glimesh Streamer. This guide will use OBS Studio as its broadcasting program, as it is the software I have covered in the most depth. If you have a question about OBS Studio or streaming in general, feel free to stop by the Streamer’s Haven Community Discord Server!
Table of Contents
Step 1: Check Your Internet Upload Speed
The first step to being able to start streaming on Glimesh is to check your internet upload speed. The reason this is first is to maybe save you some time. If you don’t have a sufficient upload speed, you will, unfortunately, be unable to stream. As such, any step beyond this one is a waste of your time.
I wrote an article that addresses the minimum internet upload speed bandwidth requirements that you can reference for an idea of how to test the capabilities of your internet plan. If you meet them, then you can proceed to the next step.
For those curious as to why your upload speed matters, it has to do with your bitrate capabilities.
I have an article teaching you about how to start on YouTube that can help you out if this applies to you.
Step 2: The Minimum Hardware Requirements
The minimum hardware required is the other major inhibitor preventing someone from starting as a streamer. If your internet is fast enough and your computer passes this threshold, then you can begin streaming on Glimesh!
What Components Matter for Live Streaming
There are four primary components that directly affect your ability to do a live stream:
- Your CPU, or Processor
- Needs to be relatively modern. The oldest processor I’d recommend is a Haswell I5-4670, but anything Intel 8th Gen or newer (Or Ryzen for AMD users) works great.
- Your RAM, or Memory (Mostly Quantity)
- You just need enough ram, really. I’d recommend a bare minimum of 8 gigs of ram, or 16 if you intend to game on it
- Your GPU, or Graphics Card
- A GPU from NVIDIA has the best encoder at this time, called NVENC. The newest encoder is available on all RTX cards, and the GTX 1650 Super is the lowest-tier card to feature it.
- and your Microphone
- I use a cheap Tonor BM-700 microphone alongside a Behringer UMC 204HD Audio Interface, but you can get by with a USB microphone or even a headset with a built-in mic to get started.
How to Check your System Information
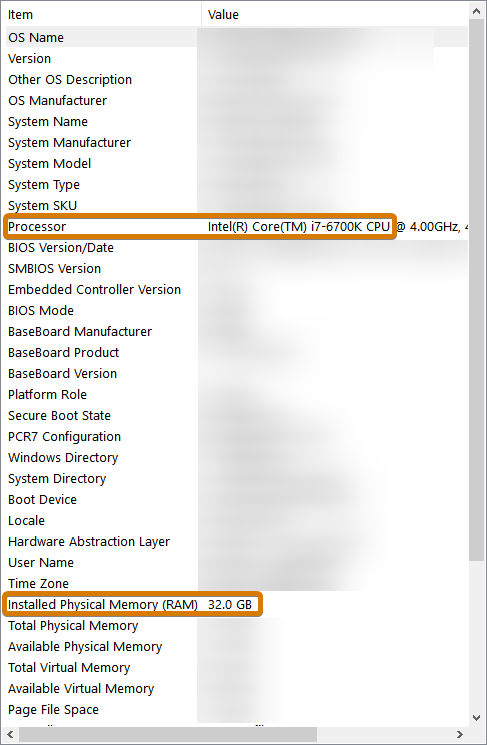
If you are on Windows 10, type in “System information” in the search box on your taskbar. This will show you a list of components, version numbers, and various other miscellaneous things. I’ve attached a screenshot above highlighting what you are looking for and blurred out the rest.
The values that matter here are:
- The Processor Field
- and the Installed Physical Memory (RAM) Field.
If your processor has at least an Intel Core i5-4670, which is the Haswell generation of the Intel Core processors, then you make the recommended processor specification. RAM is RAM, so it should work fine as long as you have at least 8 GB. Even if you don’t quite make these specs, the best way to know for sure is to try.
You can reference this site to compare your processor to the I5-4670. If it places above 230 in the rankings, it can encode without much trouble when using X264 as your encoder.
If you intend to stream using a laptop, I’ll cover that in just a minute.
Hardware Requirements of a Laptop to Stream
Using a Laptop? I got you covered! As laptop-optimized hardware has to contend with a few challenges, namely space and airflow, they have their own classifications of hardware. Laptop-grade silicon is often slower and less power-hungry than its desktop cousins. This results in a smaller thermal load, and smaller, more compact cooling solutions can be utilized to handle that load.
If you are in the market for a Streaming-ready laptop, something like this Asus ROG Zephyrus G15 would be at the upper limit of what I’d recommend. A more reasonable option would be something like this Acer Swift X SFX14-41G-R1S6 (try saying that ten times fast…)
If you don’t like those options, then simply reference this site – if the performance is around the position that the I5-4670, It will likely work fine as a streaming PC Processor.
Step 3: Get OBS Studio
After verifying that your internet speed and hardware meet the minimum requirements, the next step is downloading OBS Studio. This is my most recommended broadcasting software to prospective streamers for a few reasons:
- It’s Free
- It has a boatload of features
- Features are expandable with plugins
- Extensive documentation is available all across the internet to learn the program
Step 4: Create Your Glimesh Account
- Go to Glimesh.tv
- Select Register at the top right of the website: (It looks like this)

- Enter your desired Username
- Enter a valid Email
- Input your Password
- (Optional) Toggle the Glimesh Email Newsletter to be enrolled into the Glimesh Newsletter
- Pass the Captcha challenge (Simply “I am Human”)
- Select Register

Make sure you log in to the site after registering. It will make things a bit easier in the next section.
Step 5: Link it to OBS Studio
Next up, you need to connect a Glimesh account to OBS Studio. To do this:
- Open your Settings in the OBS Studio Controls Dock
- Select the Stream Tab
- Under Service, Select Show All…
- Scroll down until you find Glimesh
- Select Glimesh
- Go to your Glimesh Channel Settings page
- Copy your Glimesh Stream key

- Paste your key into the OBS Glimesh Stream Key Field
- Left-Click the Apply Button
Step 6: Create a Basic Scene in OBS Studio
Here is a super short tutorial to get you a barebones scene up and running in OBS Studio:
To create a scene:
- Left-Click the + button within the Scenes dock

- Enter a name for your Scene. Let’s call it Main
- Now locate your Sources dock

- Left-Click on the + button within the Sources dock
- Select Display Capture, and name it Main Display

- Select OK
Step 7: Configure Your Basic Stream Settings
In the spirit of getting you started as quickly as possible, I’m going to show you the fastest way to configure your streaming settings:
- Locate and Click on Tools in the top navigation window
- You should see this window appear:

- Check Optimize for streaming, recording is secondary
- Left-Click the Next button
- You’ll see a new window that looks like this:

- Ensure you select the largest resolution available here. The Canvas resolution is not your streaming resolution, and matching your monitor resolution here will allow OBS to properly scale to the streaming resolution. Note that 4k monitors will have issues with text legibility when scaled down to 720p streaming.
- Set your FPS to 30 (you can change this later, but I’m setting you up to have the least amount of potential issues)
- You should see a window like this:

- If it isn’t selected yet, make sure to select Glimesh as your service
- Ensure Prefer hardware encoding is checked (This will use NVENC or AMD’s equivalent over X264, drastically improving system performance while live, if available)
- Ensure Estimate bitrate with bandwidth test (may take a few minutes) is checked. This will ensure that your stream will be given enough bitrate to provide a good experience for your viewers.
- You can ignore the Stream Key, as we did that step in the 5th part of this article
- Sometimes it will fail to connect. You can uncheck the Estimate bitrate with a bandwidth test if it does to get around this issue.
If Step 13 happened to you, then refer to this article on how to manually configure your streaming settings.
Step 8: Go Live!
The very last step is to click the Start Streaming button in OBS Studio. You are now Live on Glimesh!
Conclusion – You Have The Basics in Place, Now It Is Your Turn
Now, this is the most basic of basic streaming setups to get you rolling. There are many source types to choose from that do different things, and you’ll need to experiment with them to better grasp how they can be used to produce the content you want to make.
This setup doesn’t even address audio sources and just uses the basic global audio feature. There is so much to learn about OBS Studio, and tweaking your streaming setup is an iterative process.
With that said, some shortcuts are available to you in the form of pre-made overlays from places like Own3D Pro that you can use to jump-start your content to reach a higher-quality production value. I will say that these overlays are not required, but they can definitely help bring your content in line with the rest of the Glimesh Community.
I strongly recommend that you read up on the articles I have written here on Streamer’s Haven about OBS Studio so that you know how to use the tools available to you. With that, I think that is all there is left to say about how to start streaming on Glimesh using OBS Studio.
Get out there, and good luck!