


OBS Studio Mode is a special scene transitioning tool designed to make transitioning to different scenes easier in a recording or a broadcast. Using it will let you preview the scene you are going to transition to, ensuring it is properly working before you make the transition and allowing you to make final tweaks before you initiate the transition itself.
It is, in fact, where the studio comes from in the name OBS Studio. Before this feature was added, it was simply known as OBS, though that is still the shorthand term that people use to describe what program they use.
Table of Contents
The Basic Rundown of OBS Studio Mode
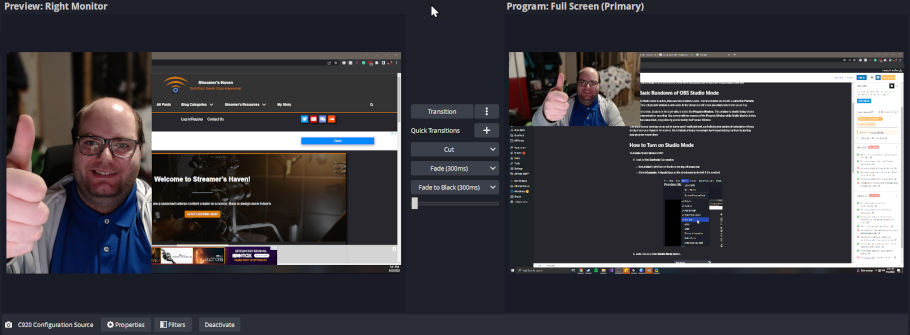
While OBS Studio mode is active, there are two windows visible. The first window on the left is called the Preview Window. This left preview window is not visible to the stream but will show you what content that scene has.
The second screen, located on the right side, is called the Program Window. This window is what is being shown to your live broadcast or recording. Due to its functionality, you cannot edit the sources of the Program Window while Studio Mode is Active – It locks the scene down, only allowing you to modify the Preview Window.
With that said, live edits to your overlays on an active scene aren’t advised, as it affects your audience’s perception of your ability to run your channel. As a result, Studio Mode actually encourages best broadcasting practices by locking your program scene down.
How to Turn on Studio Mode
To enable Studio Mode in OBS Studio:
- Look for the Controls Sub-window
- Not visible? Left-Click on Docks in the top left menu bar
- Select Controls. It should have a little checkmark to the left if it is enabled

- Left-Click on the Studio Mode button.

And that’s it!
Using Studio Mode – The Transition Button
The main functionality of OBS’s Studio mode is to transition your scenes. This much has been established already. By default, this is done using the Transition button, now located in between the Preview and Program Windows.
However, you can make this a bit easier if you set up a hotkey to do the transition. I have a full guide on OBS Hotkeys that you can check out that will walk you through the process in detail, but I’ll leave a quick picture for you to reference to know what to look for.

Just remember to ensure that the key combination you use will not interfere with your active program. Just check the hotkey guide if you run into trouble.
The Cut Transition
There is a quick transition that you can add called Cut. This will immediately swap the Program Window Scene with the Preview Window scene. This is a perfect tool to utilize if you have something wrong with an element within the actively broadcasted scene that you want to minimize being visible.
Personally, I don’t use this one all that much, as I like that animated fade effect and stinger transitions that you can have instead. With that said, every tool has its place, and the jump cut is a valid transition effect.
Extra Settings for Studio Mode
In the settings, under the general tab, there is a section of controls for Studio mode that Adjusts its behavior slightly.
- The Ability to Transition to a scene when double clicking on it
- Swap between portrait and vertical (Landscape) layouts for the Preview/program windows
- And the ability to toggle the visibility of the preview and program labels.
It’s honestly quite hidden from all but the most curious of people exploring the tool, as it is towards the bottom of the view. It is because of this that I think that, if it is possible, OBS should add a second layer of nested links, similar to this example of nested links.
Conclusion – Studio Mode Is a Powerful Tool for Creators
As simple as this tool is to use, many streamers don’t utilize it. The reasons for this are varied, but most commonly, it is due to the fact that most streamers only utilize a single scene. I will say that this is a mistake, as creating some scene variations can help to keep the interest of your audience. Human attention span is only so long, so a simple scene swap, camera swap, or just something new can help keep it on you and not dart to the next streamer.
Some basic scenes I recommend newer streamers to have are:
- A Starting Soon scene, complete with a looping trailer of your best stream moments and streamer-safe music
- Your Primary Scene
- A Secondary scene from your primary scene with a different layout or camera angle
- A Full-Screen Webcam Scene
- A Subscribers Dedication Scene
- A Stream Ending Scene
However, you can make multiple variations of these scenes to add more and more variety to your content. It never hurts to have more than you’d use because you can simply jump across multiple variations. You can even set up a timed looping macro to auto transition if you’re feeling cheeky.
The takeaway is this – having multiple scenes in your arsenal is beneficial to your content creation endeavors, and Studio Mode is there to help you make those transitions quick, efficient, and professional.