

Hey there, welcome to Streamer’s Haven! This is the first part of a series of posts called the Discord setup guide, which covers how to actually create and manage a discord server of your own. In this article, I walk you through the process of actually creating the discord server step-by-step.
A Discord server, for those who aren’t aware, is a cloud-based VoIP (Voice-over-IP) platform, with a bit of instant messaging melded in. Additionally, there is a slew of extra features that really set it apart from their competition. One such feature is Direct Twitch Integration, where a streamer, when live, shows up as being live in discord as a purple dot. A link to their stream is but a click away for their community to tune in as soon as they notice that purple dot, no extra work from the streamer required.
That twitch live notification feature is probably the main reason that discord is so popular within the live streaming community at large. But having a discord server, and running a discord server are two very different things. There are many internet trolls out there who are happy to spam your server, to drop nefarious links, to even post pornographic imagery in channels that are not properly configured. Using this guide, you can avoid most of that.
The trick? Properly configuring your @everyone role so that untrusted users who have just joined can’t wreak havoc.
Table of Contents
What you will learn in the Discord Setup Guide
As this is merely the first part of the discord setup guide, There is much that this post does not cover. Here is a list of all the parts, for your convenience. They will also be available down below in the Related posts section.
- Creating a Discord Server & Basic Moderation (This article)
- Commonly Asked Questions about Discord Servers & Nitro
- User Roles – Permissions & Advanced Moderation
- Also includes a recommendation for an Opt-in rank for being notified.
- Discord Channel Specific rules – Creating private channels
- The Best Discord Bots & their uses
Creating your first Discord Server & basic moderation setup.
Creating your first discord server can be done in as little as five steps. I’ve made it a bit longer to accommodate some recommended steps to take in order to keep it secure.
Total Time: 5 minutes
Download The Discord Client (Optional)
You can download the Windows client here: https://discord.com/new
However, since discord also runs in a browser, you don’t actually need to download anything. That said, there are advantages to using the client over the web application, particularly in the performance department.
Register your Discord Account
Navigating to https://discord.com/register will take you to the account registration page.
To create a new server, Click the Plus (Add A Server)

Select “Create a Server”.
This step is pretty self-explanatory.

Enter a name for your server, and optionally add an icon.
I recommend reading through the community guidelines as well.
![]()
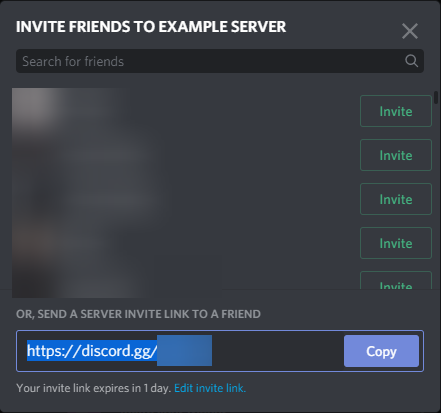
Invite your Friends.
Though you really should configure your roles first, Discord kind of pops up this bit first though. Due to this, it’s technically step 4.
Configure your Discord Server Basic Moderation
You’re going to need to right-click on the icon of your new server, and hover over “Server settings”. Click on Moderation, and consider the options carefully. I strongly recommend selecting Scan media content for members without a role at the very least.

Configure your @everyone Role
The basic role assigned to every user on a Discord server is the @everyone role. You need to configure it so that they have the appropriate permissions. Generally speaking, the roles that they should not have are:
– Administrator
– View Audit Log
– Manage Server
– Manage Roles
– Manage Channels
– Kick Members
– Ban Members
– Manage Nicknames
– Manage Emojis
– Manage Webhooks (IMPORTANT!!)
– Send TTS Messages (Just annoying for everybody)
– Manage Messages
– Embed Links
– Attach Files
– Mention @everyone, @here, and All Roles
– Mute Members
– Deafen Members
– Priority Speaker
And that’s it
Congratulations, you’ve just created and configured your very own Discord server. There is still yet much work to do, but you are in a good position to handle it with this basic level of configuration. The next article in this series covers user roles and the permissions discord allows you to control. See you at the next one!