

Audio filters are quite possibly one of my favorite things to play with in OBS. I like to tweak settings and get the most out of my equipment, whether that be by overclocking my PC or adding a tuned EQ to my music. When I finally sat down recently to revisit the filters to see what the newer editions of OBS had to offer, I was pleasantly surprised. And so began tinker time with the Expander filter to see what it did.
After all, the best way to learn what something does is to test it yourself. My process was simple:
- Crank each option to the max
- Slowly pull back the values little by little as I chant “Test test test test…” over and over
- Repeat this process for each option
To an outside observer, I’m certain that the whole ordeal would look quite silly. I certainly felt silly doing it, but hey, sometimes, you have to look like a fool in the name of understanding.
Table of Contents
The Results of testing: What does the Expander filter in OBS do?

For a quick answer, the expander helps to mitigate excess background noise from your stream, and it does this by turning the volume down of your audio signal; however, it does this only if it is below the defined threshold. What this means in practice is that it will allow you to improve the overall quality of your audio source indirectly, due to the ability to ease up on the aggression of your noise suppression filter.
I would even go so far as to say that the expander filter is now considered one of my essential tools for content creation. In fact, after I started using it, I can say that the noise gate is more or less obsolete, and can be eliminated entirely with this filter in its place. This thing is so good that I can run my AC full bore, and my air purifier on high, and they are barely audible until I start talking, and my voice is easily able to mask them.
With that said, this filter is considered a type of noise gate, so maybe that point about the noise gate above isn’t entirely accurate. I digress. ¯\_(ツ)_/¯
Where would you use it?
Here are two situations you may find the expander useful.
Say you had a member of the discord with an open mic or just has some noisy background.
Using the Expander filter in OBS coupled with the Noise Suppression filter, you can eliminate most of that noise and clean up the audio of your collaborators. No gate necessary, so the stream will be able to hear every word spoken.
You are unable to “tame” your mic with just a Noise suppressor without loosing too much audio quality.
Honestly, even if you are able to tame your mic to an acceptable level, using the expander, you can back off the level of noise suppression to regain more audio quality.
How to set up the filter in OBS
The first step to utilizing my new favorite filter is to add the filter to an audio source. This can be done by clicking on the Gear icon next to an audio source in the “Audio Mixer” sub-window, and selecting “filters”. The next step is to add a new filter by clicking the Plus icon. Finally, Select “Expander”.
Where the Expander should be in the signal chain
I can tell you right now that I disagree with the OBS Project’s recommendation of including an expander towards the end of the signal chain. In my testing, placing it right after the noise suppression filter yielded the best possible results for reducing the noise before other filters morph the signal further. You are welcome to try it out yourself and listen to the difference it makes, but I feel you’ll come to the same conclusion as me with actual testing.
You are welcome to try it out yourself and listen to the difference it makes.
I’m sure there is a valid reason for their recommendation, but for my setup at the very least, it performed best just after the Noise Suppression filter.
The seven properties of the OBS Expander filter
There are seven properties that make up the expander. These properties define how the expander will function, as well as tune how aggressive or passive it is. There are a number of ways that you can configure this from this list of seven properties to accomplish different tasks.
The full list includes:
- Presets
- Ratio
- Threshold
- Attack
- Release
- Output Gain
- Detection
Presets – What are they?
Presets allow you to set it up to act as a normal expander, or as a “Gate”. For now, stick to the “Expander” preset. This preset will give you the behavior explained within this article, and in my opinion, offers the best results. There isn’t much else to this section, as the filter is fairly straight forward without many moving parts.
Ratio – How it affects your Audio
The Ratio is a measurement of “how much” it will affect your signal. I find that setting this value to anything over 5:1 makes the filter unusable, as it is noticably fluctuating in volume.
For my environment, I found that setting it to 2:1 yielded the best results.
Threshold – The point where the filter will kick in
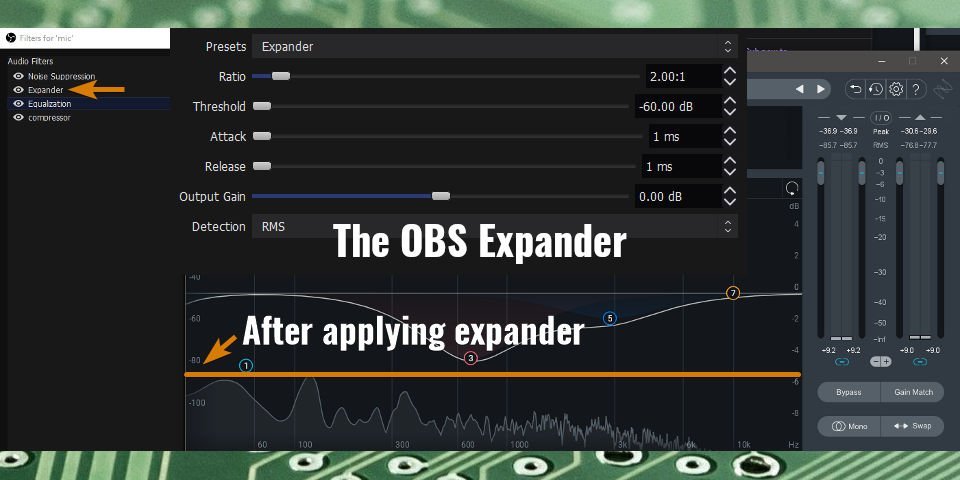
This is where the magic of this filter happens. I set this value to -60 dB, as it reduces my ambient audio levels by an average of -35 dB across the entire spectrum in the lows with my AC, and Air purifier going full bore. Before applying the filter, it sat around -58 dB in some areas You may have to increase this value a little bit as every room is different. Tweak the value while monitoring your mic for the best results.
Attack & Release – How quickly the filter will start and stop
I’m going to go over these together, as they both end up having the same value of 1ms in my final settings. The attack is “how fast” the filter kicks in, while the release controls how long it is active before it reverts to its default state. It is worth it to mention that the OBS Devs recommend keeping Attack at 5-10ms and release at 50-120ms. Personally, I haven’t seen any issue with setting it lower, but I presume it may impact the amount of CPU resources that the filter utilizes.
Output Gain – Used to boost or lower the volume
This is literally a variable gain adjustment, which has a direct effect on the loudness of your overall signal. Unless your are unable to get your microphone to average at around -15 dB through -10 dB, I recommend leaving this setting at 0.
Detection – The method in which the expander uses to read the signal
This is a selector for the method that the expander uses to detect the audio signal. The OBS devs Recommend sticking to RMS.
If you’re interested in learning more about the various audio filters, I recommend starting with the compressor filter. With that being said, I wish you the best of luck on your streaming endeavors.