OBS Studio is a powerful broadcasting software with a myriad of features available. One of those features is support for source filters, which changes how the source works in some way. In this article, I’m going to teach you how to use these filters on OBS.
There are also a number of plugins that you can find that can further expand the possibilities of these filters. For example, the source record plugin, which allows you to record a source without your overlays or alerts.
Table of Contents
What Is a Filter in OBS Studio?
Filters in OBS Studio are modifiers placed on sources that are designed to change them in some way. They can change the appearance of a source dramatically with something like Color Correction, morph sound using VST plugins, and even provide a means to remove the background of a webcam using a chromakey filter combined with a green screen.
There are two types of Filters for sources:
- Audio/Video Source Filters
- and Effect Filters
Filters that are designed to work with video affect how those sources look, and are able to change the sound that is embedded within.
How to Add a Filter on OBS Studio
Adding a filter to OBS Studio is pretty easy:
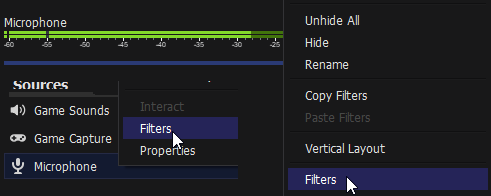
- Right click a Source
- Select “filters”
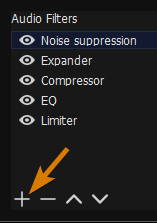
- Click the + sign
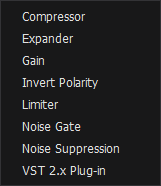
- Select a Filter – What appears here will vary based on the source type.
Effect Filters – What Are they?
Effect Filters are designed to change the appearance or display of a source in some way. They can be applied to pretty much every source that isn’t a audio only source, and are useful in specific cases.
One popular use case is the scroll filter, which is typically used on Text (GDI+) sources to have it scroll across the screen. This effect is heavily used by news broadcasting stations, particularly the “Breaking News” scroll bar.
Professional photographers & YouTubers will quickly notice the “Apply LUT” Filter. This is an invaluable asset for morphing the color space of your media sources. This is an advanced tool, but is helpful to have for those of you who are going for a specific look to your video.
What is a LUT?

LUT stands for Lookup Table, and it works by mathematically reassigning color values in an image or video to other values. The LUT you decide to go with will ultimately determine the final appearance of the shot in question; should you choose to use a LUT in the first place.
A well made LUT won’t change the original image much, but just apply some minor color alterations to achieve the desired look.
By Default, OBS comes shipped with a few very basic LUTs to introduce you to the concept by giving you a rough idea of how they affect your image.
For an example of where you might use a filter, say you notice your voice isn’t synced to your webcam video feed. Well, you could use a delay filter to fix it. Before you try this filter though, check out this article that covers Audio Sync Fixes for OBS Studio, as that has a better solution to this particular use case.
D:\Video Production\OBS-Studio\data\obs-plugins\obs-filters\LUTs
<!--You'r path will be different from ours here, but they are located in your OBS install directory.-->
Say you apply a LUT to this fireworks video and choose black and white, to desaturate the color a bit. You can do that!


But if desaturating the media is all you need to do, you can accomplish the SAME EFFECT using the Color Correction Filter instead. The downside is that one method may be more system resource-efficient over the other method.

In most cases, the processing costs are negligible for both methods used here. But really, you can see just how drastically you can modify any image or video using these powerful tools without modifying the original media at all.
Free & Paid LUT Packs to Spice up Your Production
Now, I’m not going to go into too much detail or dig too deeply into these LUTs. Everyone has a certain preference style in mind for their streams. These recommendations may not necessarily be the best for you. Let us know if you have a certain LUT package you’d recommend to others!
Free LUT Packs:
Paid LUT Packs: I chose the two best LUTs that I feel streamers would see the most benefit from. I do not earn anything from purchases made from these links.
The LUT filters on OBS can really make an astounding difference.
Where Would You Use a Color Correction Filter?

My Favorite use for the color correction filter is with browser media source. The reason is that you do not normally have a lot of control over the appearance of these sources. For example, the controller overlay from Gamepad viewer. By default, the Red and White DS4 is far easier to see where the sticks are over the normal Black & Gray color scheme. However, you can tweak it further…

So as you can see, the creative use of these filters can morph the media content to look DRASTICALLY different.
This method is not without its own faults, of course. You can’t mask out sections. It is an all-or-nothing solution. But it is a way to modify the look of an overlay element on your screen you normally don’t have any control over. That is the point I am trying to make here: You can personalize the look of your stream even more for elements you have very little control over normally. Filters in OBS are merely one of those ways to do that.
Chromakey, Color Key & Luma Key – What Is the Difference?
As a streamer, you are probably quite familiar with Green screens. Well, a Green Screen is simply a physical chromakey material used to set up and utilize background removal technology. What you may be less familiar with is the color and luma Key. Each of these filters works to remove a specific color from the image by setting that color to alpha. But the ways they go about doing it differs slightly.

Starting with Chromakey, this filter’s name comes from the word “Chromatic”, meaning ” relating to or produced by color. ” The key part of the word refers to what OBS is doing to the media. In this case, we are telling OBS to look for a specific color, and render that color as a transparent alpha color. The result? Video Background removal.
So what about Color Key? Well, the word “Key” is still present, so it still sets a color to be transparent, but it does it using a different part of the color data to do so. In the case of the Color Key, it is utilizing the “Darker” data

As for the Luma Key, It is referring to the luminosity of the media. It will key out the highlights of the media, rather than the color.

My Recommended Green Screen
Elgato has positioned themself firmly into the streaming niche with many products that benefit streamers. Their green screen is one of those products that has a level of polish all on its own. Rising up from the floor, or hung on a wall, (Separate product) It is versatile and effective.
Also, when using a green screen, lighting becomes even more important for both you and your chromakey filter. Even lighting will ensure that no shadows will inhibit the effectiveness of the key, and help improve the video quality of your face camera, even if you are only using a C920.
With that said, Elgato’s green screen options are somewhat expensive, and a tad small. I wrote an article about ultra-cheap green screens, for those of you on a budget and have the room for a larger screen. Remember, all green screens need their own dedicated light to avoid difficulties getting it to key out properly.
The Rest of the Filters on OBS
If you have messed around with photoshop, Gimp, or other image manipulation programs, you will probably be familiar with cropping.
Cropping in OBS basically means changing the boundary of a source, and masking the rest into transparency. Rather than by color, it accomplishes this by moving the bounding box inward. The opposite is pad. Padding basically means to put some extra space in between the normal end of a bounding box. This makes it easier to utilize the bounding box snapping that lets you quickly align sources.
Admittedly, cropping/padding has extremely limited use, typically to square off a Webcam feed. (Some people like 4:3 Aspect Ratio for this.)
Speaking of, the Aspect Ratio/Scaling Filter can be ignored filter almost entirely. Its use is to produce the aforementioned 4:3 or any other format content when your source content is something else. Twitch uses the 16:9 ratio primarily, due to how popular 1080p displays are. That said, if you have ultra-wide display, then you may find this filter to be invaluable.
Finally, Image Masking is something you can do to create “Feathered Edges” to your webcam or make a circular webcam.

OBS Filter Effects Have Limits – Don’t Push Them Too Far
You may have noticed the strange grid at the edge of the fireworks image there. Kinda blocky, eh? Those are the grainy artifacts that are the result of the Saturation & gamma being set too high. To retain the quality of the media, you will need to use these tools with moderation.
Too much in one direction, and you will see these artifacts rear their ugly head, and the effect is even more pronounced on stream. The reason is that these extremes don’t compress well, and video fidelity drops off a cliff quickly as a result.
“Less is more” applies here all too well. Typically, you try to keep brightness, contrast, Saturation and Gamma in the Color Correction filter within a 0.1 to 0.9 range over and under its default value. As for other filters, Trial and error will be the best way to learn the limits. The reason is the media being filtered will determine how far you can push the filter.
I strongly recommend looking into filters in OBS, particularly the LUT package. Just remember that each filter you add does add some post-processing overhead to your system; If you are already nearing the limits of your encoding capabilities, then you will need to make use of filters in moderation. One or two won’t affect you much, but a filter on dozens of sources do add up on the overhead.
As always, Thank you for reading. Be sure to join the Streamer’s Haven Community discord if you have any questions about streaming!


