

If you’re anything like me, you may miss the old days of listening to your music on WinAmp to its impressive collection of audio visualizer effects. While it remains true that, for the most part, audio visualizers have fallen out of style for everyday users, they still have a use today for those of us who create video content on YouTube. Particularly for intros and for tailored VFX B-Roll content.
Say, for example, you want to make your channel logo dance in the corner of your screen for the accompanying background music for your intro. Rather than try to manually create this, you can use a plug-in tool called Reactor in DaVinci Resolve 17, and your logo will pulse to the beat.
Before I get too deep into this article, I wanted to put this out there – This post is designed to do two things:
- Inform you about the existence of the tool
- To reference quality tutorials that are easy to follow to achieve the Audio Visualizer effect for your video content.
This is because a video tutorial format is superior for teaching you how to use the Audio Visualizer effect.
Table of Contents
Addressing the… Stuffed Animal In The Room

Reactor, the DaVinci Resolve Fusion plug-in you need to create an Audio visualizer effect out of an image is by a Blackmagic Fusion Studio Community who calls themselves “We Suck Less.”
Now, I know what you’re thinking – A tool designed by a community that calls themselves “We Suck Less” with a muppet mascot as their defining logo feature on a shady-looking forum screams of a scam. Or, at the very least, a virus. However, I’ve looked through YouTube, across multiple videos that answer this question in a tutorial format (for my own learning and for validation of the tool), and found nothing that really stood out to me as being potentially dangerous.
In fact, most videos show proof of it functioning properly.
But a quick disclaimer, I can not guarantee the tool to be virus or malware-free – The script itself is in LUA. However, I don’t understand that language well enough to understand everything it is doing when opening it in notepad++. What I do know is that there is a reference to a private Git within this install script, in the form of downloading files from a private repo on Gitlab. I couldn’t find a link to the git repo itself on their website anywhere. (Not to say it isn’t there, I just couldn’t find it.)

Video Guides By Multiple Creators to Validate the Tool
The following links in the list are tutorials on using the Reactor plug-in tool and the validation that convinced me the tool was safe enough to write about. Additionally, I think that a video format tutorial is superior for teaching you how to use the tool itself, as a written guide for this subject simply isn’t as easy to follow. That said, a written guide follows for those who prefer that format.
Consider subscribing to these creators if you intend to learn more about DaVinci Resolve for yourself.
- Audio Visualizer that REACTS to Music in DaVinci Resolve 16 – Jason Yadlovski
- How To Make An Audio Spectrum Visualizer In Davinci Resolve/Fusion(Free Versions) – Learn Now FX
- Audio Visualizer in DaVinci Resolve – CB Super
- Audio Visualizer | DaVinci Resolve tutorial – VDV Productions
These videos were created for DaVinci Resolve 16; however, this tool still works without issue in DaVinci Resolve 17. There are many other tutorials by other creators about this tool on YouTube as well, so if you need more guidance, it is merely a quick search away.
Written Guide to Using Reactor for your Audio Visualizer FX
For those of you who prefer a written, step-by-step guide for installing and using Reactor for DaVinci Resolve 17, I got you covered. I’m going to keep it as concise as I can to make it as easy to follow as possible, but if you have any questions about this guide, please let me know in the comments so I can clarify it for you.
Reactor Fusion Plug-in Install Guide for DaVinci Resolve 17:
- Download Reactor from We Suck Less
- You’ll need to scroll down roughly a quarter of the way to find the link
- Open up DaVinci Resolve 17
- Switch to the Fusion Tab at the bottom by clicking on the Sparkly Wand icon
- Drag the Reactor-Installer.lua script into the Fusion Nodes area

- Click “Install and Launch”
- Wait for the Installer to finish
- When it finishes a new window will appear that will show a huge number of third party fusion effects
- Type “Suck Less” into the search bar, and check “Suck Less Audio”
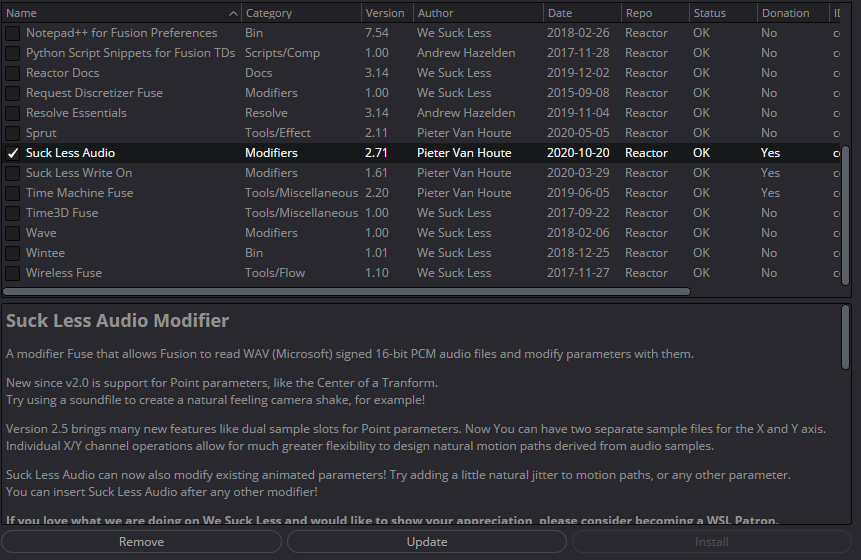
- Click the Install Button – You’ll be prompted to donate to the project, but that is optional
- Click “Not Right now… but I will consider it!”

- Restart DaVinci Resolve 17
And now Reactor and its dependencies have been fully installed and are ready to use!
How to Use Reactor
- Switch to Edit Mode

- In your toolbox, select Effects, and drag the Fusion Composition Clip to your timeline (away from your existing project clips)

- Select the Fusion Composition Clip (It will have a red outline when selected)
- Right-click the clip, and select “Open in Fusion Page”

- Open the Media Pool Tab
- Select your logo, and drag it into the node area
- Don’t have your logo in there? Navigate to it in your File Explorerer, and drop it into the Media Pool
- Select the logo Node, and Add a Transform tool

- Connect the Transform node to the MediaOut1 Node from the Grey square
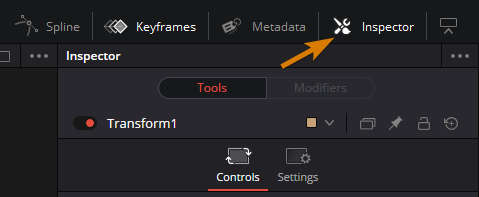
- Select the Transform Node
- Open the Inspector
- Locate “Size” and right click it
- Hover over “Modify with” and select “Audio (WAV)”
- Audio File can only be a .wav format. It cannot be MP3 or any other format for that matter. You can easily convert audio files online if you don’t have a .wav format of your file.

- Select Modifiers

- Choose the wav file you want it to react to. It needs to be 16 bit PCM as well for the tool to work.
- If online converters are not giving you the proper setting, you can use the Reaper DAW to convert the audio file manually to 16 bit PCM WAV.

- Play with the settings here. Avoid Time offset unless you know what you’re doing, as it makes it hard to line the audio up with the visualizer.
- Put the audio track in below the Fusion Composite Clip to have the audio play back in video.
- …
- Profit!
Whew! That was a long list of steps. But, again, I feel that a video format tutorial is far better for this sort of thing, so if you haven’t yet looked at one of those I listed above, I recommend doing so if you’re lost on one of these steps. I hope that this little tutorial was helpful for you nonetheless.